Sunday, October 17, 2021

ODI 12c - Loading Flat file to SQL table

Here, we will read a comma separated csv file and sends data to target Oracle table.

Steps:

File format:


Step1: Topology - Physical Architecture - File - File Generic


Step2: File data server - New Physical schema


Step3: Provide directory


Step4: Create new logical schema


Step5: Designer - new model folder - new model


Step6: provide all details like name, technology and logical schema name


Step7: create new data store


Step8: map and provide LKM and IKM and flow control as false.


ODI 12c - loading XML file to SQL table

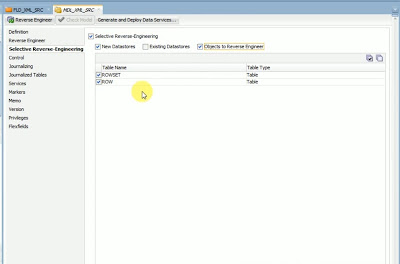
Here, we will see how to load a XML file to SQL table.

Steps:

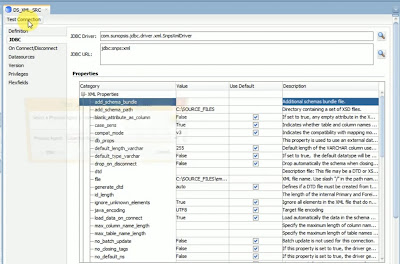
Step1: Topology - Physical Architecture - XML


Step2: New data server


Step3: Dataserver name


Step4: JDBC - provide schema path, file directory etc.

Step5: It will create a DTD file for that XML file.


Step6: Created data server - new physical schema.

Step7: provide schema and work schema.


Step8: Logical architecture - XML - create new logical schema.

Step9: provide the physical schemas for each contexts.


Step10: Designer - create new model


Step11: provide name, technology, logical schema etc.


Step12: Reverse engg - select System table


Step13: Selective Reverse engg - select objects and reverse engg.


Step14: datastores created.


Step15: create new project and map and mapp source and target datastores.


Step16: Physical - Choose LKM


Step17: choose IKM and flow control as false.


ODI 12c - Use unique temporary object name

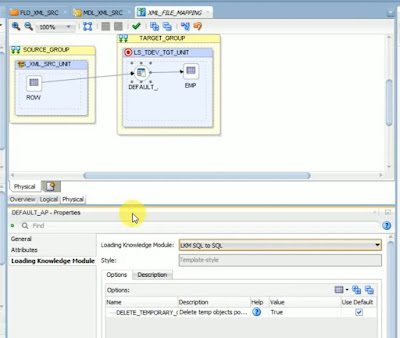
When ODI loads data from source table or datastore to Staging table, it stores to C$_default table then from there it sends the data back to Target table or datastore.

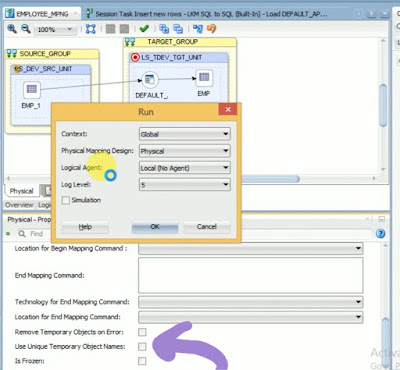
If we want to use unique object name like the unique staging area C$_12unique...default table then we have to go to mapping - physical tab and select option - "Use Unique Temporary object names".


ODI - Import OOTB Knowledge modules

By default, ODI will provide us few of the Global Knkwledge modules. Apart from that, we can also import Oracle provided KMs.

Steps to import:

Step1: Go to your created project and right click on the Knowledge modules object and traverse the following directory and select the required KMs and  press ok 

Path: C:\Oracle\Middleware\Oracle_Home\odi\sdk\xml-reference


Monday, October 11, 2021

ODI 12c - Model creations with constraints

Here, We will create a primary key constraints on dept no. On dept model datastore.

Steps:

Step1: Create a model folder.


Step2: provide folder name


Step3: right click on the created folder and create new model.


Step4: provide model name, technology, logical schema and agent if any and save.


Step5: Go to Reverse engg for masking if any

 
Step6: Go to selective reverse engg and select objects to revers engg and select tables as needed and click reverse engg.
 

Step7: tables will be created.


Step8: Expand dept data store and click on Constraints and new key


Step9:select primary key


Step10: go to attributes and select deptno


Primary key created. This key will be created in ODI level not on db level.

To create db level key, go to control of the constraint and select defined in the database.


ODI 12c - Scheduling ODI load plans

Implementation Steps:

Step1: Locate the ODI load plan you created. And expand your load plan by clicking on the + sign next to the name of the load plan.  This can be found within the “Load Plans and Scenarios” tab. Highlight the “Scheduling” option and right mouse click..  Then select New Scheduling.


Step2: Within the definition tab you, you will need to enter in execution options such as, “Context, Agent, and Log Level.”  Once you have entered that you will need to select a Status. Here in our example we will leave this “Active.”  Once you have selected your status, then you will need to enter you execution options.  Here you will need to select when you want your load plan to run.  Once the following definitions have been set, click the save button. 


Step3: Next you will need to click on the “Topology” tab and expand the “Agents” listed under the “Physical Architecture” sub tab. Select the agent in which you are using to execute your load plan.  Then highlight and right mouse click.  Here a list of options will appear in which you will need to select “Update Schedule.”  This will update the ODI agent to reflect your scheduled changes.


In addition, to make sure your ODI load plan has been added to the ODI scheduler you can view the scheduler by selecting the “View Schedule” when highlighting and right mouse clicking the ODI agent.

Featured Post

11g to 12c OSB projects migration points

1. Export 11g OSB code and import in 12c Jdeveloper. Steps to import OSB project in Jdeveloper:   File⇾Import⇾Service Bus Resources⇾ Se...