Thursday, August 25, 2022

OIC - Get object from OCI object storage using OIC | Oracle Integration Cloud

Usecase: Here, we will create an object storage rest connection and using that connection, we will create an app driven integration, configure rest call to object storage and get the file from object storage.

Implementation Steps:

Step1: Create Rest connection.

Oracle home >> Integrations >> Connections >> Create >> Rest 

Provide rest API base URL


Select Securtiy as OCI Signature version 1


Provide Tenancy OCID, user OCID, private ley and fingerprint.


Test and save.

Step2: Create an app driven integration 

Integration flow:


Configure Rest input as object name and output as Binary


Call the rest connection to get the file or object from object storage

URI: /n/{namespaceName}/b/{bucketName}/o/{objectName}
Verb: GET
Configure Request Payload as Binary Format


Map the bucket name, object name and namespace.


Map the object storage response file reference to rest response.


Test


How to create a OCI object storage bucket, how to get Tenancy OCID, User OCID, API private RSA key and finger print and Namespace, everything mentioned in the previous blog. Pleae check below link.

https://soalicious.blogspot.com/2022/08/oic-how-to-use-oci-object-storage-from.html

Tuesday, August 23, 2022

OIC How to use OCI Object storage from the Oracle Integration Cloud | Put a file to OCI Object storage from Oracle Integration Cloud

UseCase: Here, we will create a OCI object storage bucket. From OIC, read a file and put that file to bucket using Rest connection.

Step 1 : Create a bucket in OCI object storage

In the Oracle console >> Storage >> object storage & Archive storage >> select the required compartment >> create bucket


Step 2 : Create a Object storage Rest connection

To create a Rest connection , we need to collect the following information:

Connection type : REST API Base URL

Connection URL : https://objectstorage.<region>.oraclecloud.com

My case, region is: us-ashburn-1

Securtity: OCI Signature Version 1

Tenancy OCID and Object storage Namespace: get the Tenancy OCID from the OCI console on the Tenancy Details page.

Search Tenancy in the search box


Or from profile >> Tennacy


Here we also got the Object storage namespace.

User OCID : get the user's OCID in the console on the User details page.

Profile >> User Settings


Private Key & FingerPrint: 

Profile >> User settings >> API Keys >> Add API Key >> download private key >> add >> note the fingerprint.


Oracle home >> Integrations >> Connections >> Create >> Rest 


Test and save.

Step 3:  Create the Integration

Integration flow:


Read the file 


Call the rest connection to put the file to object storage

URI: /n/{namespaceName}/b/{bucketName}/o/{objectName}
Verb: PUT
Configure Request Payload as Binary Format.


Map the namespace, bucket name, object name and fileReference to stream reference.

Save, Add Tracking and activate and test

See the below file uploaded to object storage bucket.


Note: Private key downloaded from the Oracle Cloud Infrastructure Console are in PKCS8 format. The OCI Signature version 1 security policy available with the Rest adapter only supports reading of the private key in RSA format(PKCS1) format.

If you receive the following error, you must convert the private key from PKCS8 to RSA(PKC1) format:

oracle.cloud.connector.impl.rest.security.signature.signatureException: java.lang.ClassCastException: org.bouncycastle.asn1.pkcs.PrivateKeyInfo can not be cast to org.bouncycastle.openssl.PEMKeyPair.

Convert the private key with the following command:

openssl rsa -in private_key_in_pkcs8_format.pem -out new_converted_file.pem

We can also convert it using online availavle site like below:

https://8gwifi.org/pemconvert.jsp

Reference:

https://blogs.oracle.com/integration/post/how-to-use-the-oci-object-storage-from-the-oracle-integration-cloud


OIC Interview question and Answers | Oracle Integration Cloud

OIC interview Q & A:

1. FBDI approach with an example

https://soalicious.blogspot.com/2022/02/oic-erp-supplier-bulk-import-and.html

2. OIC FTP vs OIC File adapter

Answer: https://soalicious.blogspot.com/2021/05/oic-file-adapter-vs-ftp-adapter.html

3. ERP events callback or subscription.

Answer:https://soalicious.blogspot.com/2023/03/erp-register-csf-key.html?m=1

4. Gen1 vs gen2 OIC pack

https://soalicious.blogspot.com/2022/03/oic-gen-1-vs-gen-2-benefits-of-oic.html

5. OIC Agents

https://soalicious.blogspot.com/2020/10/oic-connectivity-agent.html

https://soalicious.blogspot.com/2020/11/oic-connectivity-agent-part-2.html

https://soalicious.blogspot.com/2022/05/oic-install-connectivity-agent-in.html

6. How to handle large file in OIC

https://soalicious.blogspot.com/2021/05/oic-how-to-handle-more-than-10-mb-file.html

7. OIC error handling:

https://soalicious.blogspot.com/2021/12/oic-ootb-error-handling-in-easy-steps.html

8. OIC Integration pattern/ Styles

https://soalicious.blogspot.com/2019/11/oracle-cloud-integrationoic-introduction.html

9. OIC migration from one instance to higher one.

https://soalicious.blogspot.com/2022/02/oic-migration-of-integration-from-one.html

10. What issues you observed in OIC ERP.

https://soalicious.blogspot.com/2021/03/oic-synchronous-integrations.html

11. Can file adapter and ftp adapter support high availability mode using connectivity agent?

https://soalicious.blogspot.com/2023/07/oic-can-file-server-and-ftp-server.html

12. Maximum duration for integration flows | time out time for OIC services | Service limit for Scheduled orchestration or Async or Sync service

https://soalicious.blogspot.com/2023/06/oic-maximum-duration-for-integration.html

13. Why to avoid creating too many scheduled integrations

https://soalicious.blogspot.com/2021/07/oic-why-to-avoid-creating-too-many.html

14. How many different scheduled integrations can run in parallel in Oracle Integration | Decoupled scheduler and Business Logic pattern.

https://soalicious.blogspot.com/2023/09/oic.html

OIC Tracing | How to enable and use OIC Tracing | Oracle Integration Cloud

Why we need tracing: 

  • When Tracing is enabled, OIC integration prints detailed information before and after each action / activity that is executed. It also prints the message / payload of needed. 
  • We should make sure that it is enabled only for debugging purposes and turned off before going into production.
  • When tracing is enabled, integration activity can be viewed in Activity Stream.
Types of Tracing:
  1. Integration Level : If your requirement is to enable the tracing for one or more integrations and disable tracing for the rest of the integrations, you can ise Integration level tracing.
  2. Global Tracing On : It will turn tracing on for all activated flows and we can't enbale/disable it at individual level on the integration page.
  3. Global Tracing Off :  It will turn tracing off for all activated flows and we can't further enbale/disable it at individual level on the integration page.

How to change the level of Tracing:

Oracle home >> Settings >> Integrations >> Tracing


If we choose the Integration level tracing, we can enbale or disable the tracing at individual integration level following below steps:

Go To Integrations Page >> select actions >> Tracing >> Enable Tracing & Include Payload >> Save


Tuesday, August 16, 2022

OIC to ERP : Move custom report | download custom report based on ess job id and then move to desired folder

Usecase: Here, we will create a sub integration which will take a request id and check if ESS job status, if its succceeded, it will download the report and move the file to desired mail dl or sftp directory.

HighLevel steps:

  • Main flow (where import and child process runs) call to callback integration
  • Archive the success file
  • Execute the execution accounting report based on child request id for support help.
  • Call ESS job which internally calls the BI report to execute the SQL query to get the callback report
  • Call a Sub Integration like MoveCTRLReport and feed the ESS job process id
    • Here, check the ESS job status using getESSJobStatus(Interesting fact is that we are looping max 55 times to check if the ESS process completes )
    • If ESS process gets completed,
      • Download the control report using downloadESSJobExecutionDetails operation
      • Write the control report in stage
      • Unzip the report
      • Read the text report
      • Move the report to FTP location

Request payload:

{

"RequestId":"",

"directoryAdapter":"",

"sourceFileName":"",

"targetDirectory":""

}

Implementation logic steps:

  1. Configure rest request with post verb. Request json payload spacified above.
  2. Assign looping variables like
    1. LoopCounter = -45.0
    2. ESS_Status = ""
    3. MaxLoopCount = 9
  3. Take a while loop with condition $Loopcounter < $MaxLoopCount and $ESS_Status != "SUCCEEDED"
    1. Call Erp cloud adapter - operation: getESSJobStatus and service : erpIntegrationService and map request Id.
    2. Wait 59 sec
    3. Assign status like
      1. LoopCounter = Loopcounter +1
      2. ESS_Status = result of the getESSJobStatus
  4. Take a switch and check if ESS_Status = SUCCEEDED 
    1. If yes,
      1. Call erp cloud adapter and download control report using service: erpIntegrationService and operation: downloadESSJobExecutionDetails. And map request id
      2. Write control reports to stage location using sourceFileName, temp stage location and using opaque schema and map the content to opaque element.
      3. Unzip the zipped contents using stage
      4. Read text control report using stage and xsd opaque file. Specifying file name as unzipcontrolreport/properties[filetype='text']/filename
      5. Call another sub integration like OIC_File_Handler to move the control report to desired sftp or s3 folder. Or send a mail attaching the report.
    2. If no, throw new fault with code, reason, details.
Sceenshots:
TBD

OIC To ERP - Design steps for Import and Custom callback | Oracle Integration Cloud

Usecase: Here we will see a design how we can import to Cloud ERP and get a Custom callback. 


Implementation Steps:

Follow the below design steps:

Friday, August 12, 2022

SQL query WITH clause | Database

  • The SQL WITH clause is used to provide a sub-query block which can be referenced in several places within the main SQL query.
  • The usage of WITH clause is very similar to creating tables. When you create a table, you give it a name. Similarly, when you use the WITH caluse, you also give it a name  and this name essentially acts like a table name in the main SQL statement.
  • WITH clasue dose not create a table or view, the object associated with the WITH statement disappears after the main SQL statement is executed, and there is nothing to clean up.

Syntax for single sub-query alias:

WITH <alias_name> AS (sql_sub-query_statement)

Sysntax for multiple sub query :

WITH <alias_name_1> AS (sql_sub-query_statement_1), <alias_name_2> AS (sql_sub-query_statement_2),.....

Example:

Suppose we want to list all the stores that have more sales than the average.

With t1 as 

(Select avg(sales) avg_sales from store_sales)

Select a1.* from store_sales a1, t1

Where a1.sales > t1.avg_sales;

Input:

Store name sales

A 15000

B 2500

C 3000

D 7000

Output:

Store_Name Sales

A 15000

D 7000


Thursday, August 11, 2022

OIC - get ESS job status of the child process of the import job

Here, I will show you how to get child process id of the Import process and then to get the the ESS job status of the child process once the import job completed and you have the ess import request id.

Logic: 

we will create a loop and check the ess job status using the import request id whether the ess import job is successful or not(at each loop it will wait 59 sec). 


Follow the below steps:

Step1: Get the Child Process id calling BI report.

https://soalicious.blogspot.com/2022/01/oic-erp-how-to-get-child-process-id.html

Step2: Take an assign with the following variables:

I_inProgress : "true"

I_childRequestStatus : ""

I_childRequestID: decodebase64(reportBytes) << from BI report response

Step3: take a while activity and add the following condition.

$I_inProgress = "true"

Step4: Take a wait activity and assign some time to complete the child process lika value 59sec.

Step5: Drag and drop Erp cloud adapter and configure following:

Provide a name: essJobStatus

Select Query, Create, Update or delete information.

Select service: ErpIntegrationService

Operation: getESSJobStatus

Step6: Map the child request id to request id of the getEssJobstatus.

Step7: Take a assign named like updateProgress and do the following:

I_inProgress : returnStatus(result of getESSJobStatusResponse)

I_childRequestStatus: result of getESSJobStatusResponse.


Click here how to convert the status to boolean value:

oic-js-return-boolean-status


Tuesday, August 9, 2022

OIC - Create a header file based on sequential unique lines Transaction number | Oracle Integration cloud

Usecase: Here, the requirement is, we will have a source file which contains sequential duplicate transaction based lines or records. Based on sequential unique transaction numbers we have to fetch unique lines and write header file.

For instance,

Source file:

Transaction_Identifier,Transaction_number,Event_Type_Code,Ledger_Name,Date

Line,10,Payment,XX,08/09/2022

Line,10,Payment,XX,08/09/2022

Line,11,Reverse,XX,08/09/2022

Line,12,Payment,XX,08/09/2022

Line,12,Payment,XX,08/09/2022

Line,13,Payment,XX,08/09/2022

Line,13,Payment,XX,08/09/2022

Line,14,Payment,XX,08/09/2022

Expected output header file:

Transaction_number,Event_Type_Code,Ledger_Name,Date

10,Payment,XX,08/09/2022

11,Reverse,XX,08/09/2022

12,Reverse,XX,08/09/2022

13,Payment,XX,08/09/2022

14,Payment,XX,08/09/2022


Logic steps:

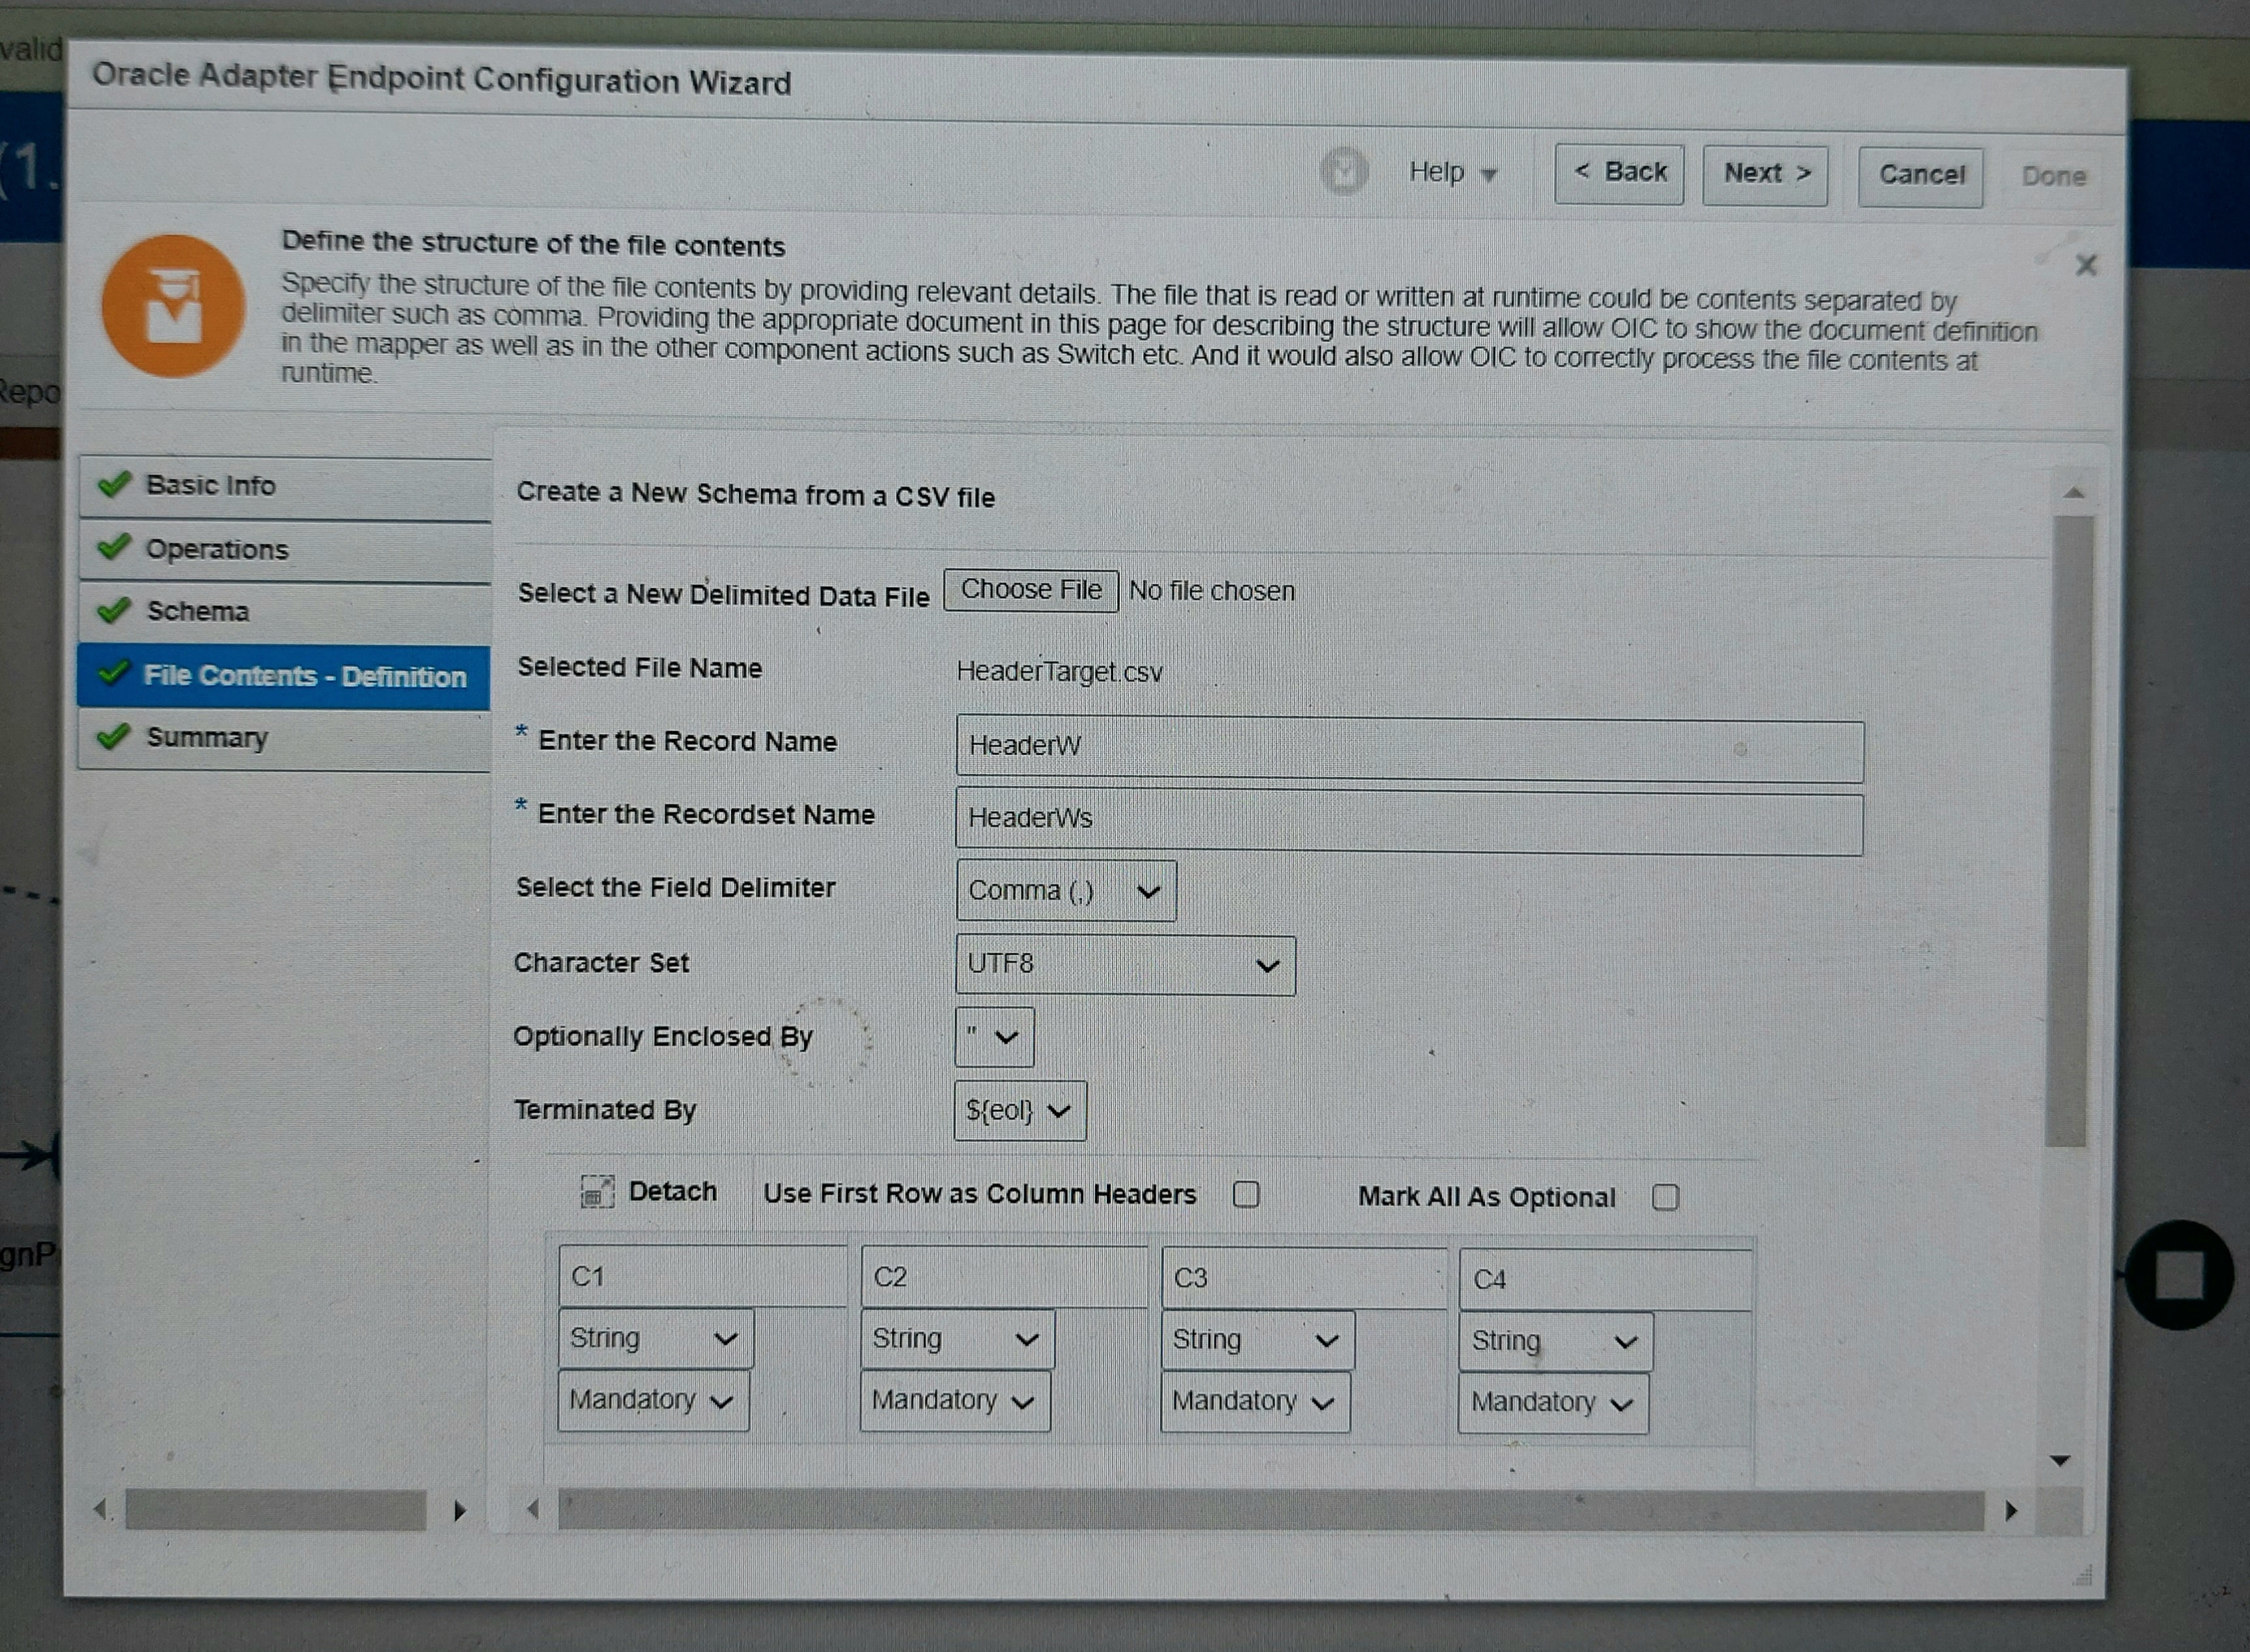
  • Using FTP adapter connection, download the file to stage location and then read the file reference using sample csv filw format.
  • Assign preTransactionNumber as empty string("").
  • Write the header field names
  • For each ledger line or record,
    • Assign the current transaction number to variable transactionNumber
    • Take a switch and put condition as preTransactionNumber != transactionNumber
      • If its true, write the ledger record to header file to that stage location
      • Otherwise, skip the duplicate line
    • Assign the preTransactionNumber = transactionNumber
  • After the loop, read the entire header file from the stage location
  • Write the file to a FTP location.

Steps with screenshots:
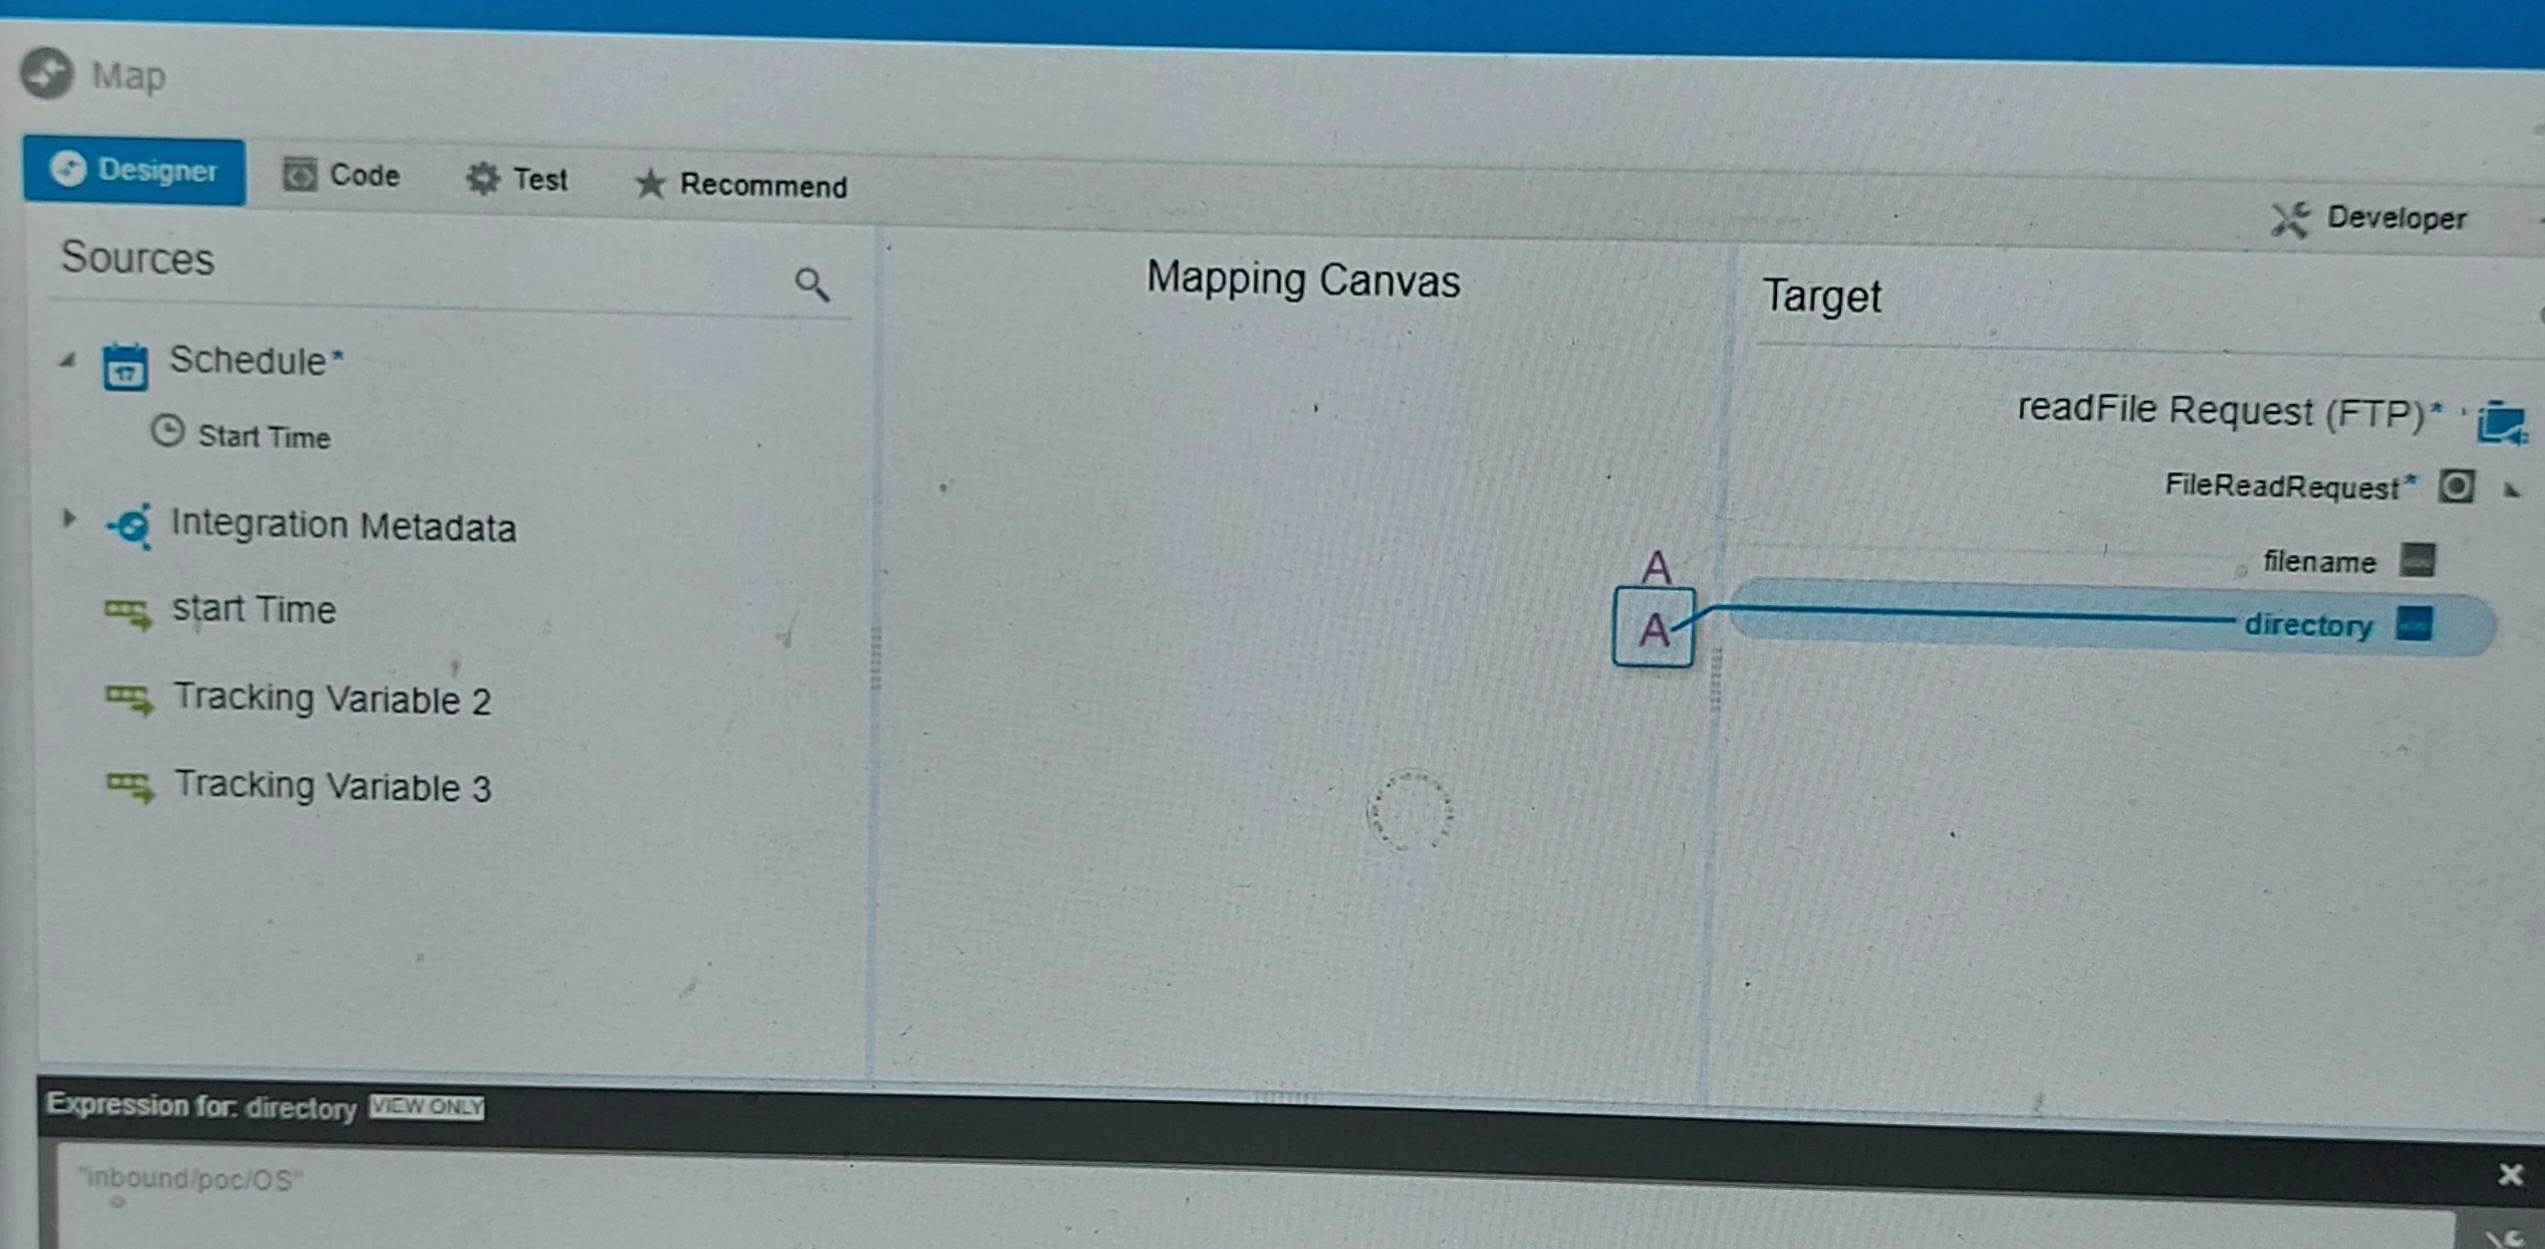
Download the file


Created 2 schedule parameters to feed the file name and file directory.


Read the file reference 


Assign preTransactionNumner as "".


Write the header field names.


For each ledger record


Assign the transaction number


Take a switch and check if preTransactionNumber != transactionNumber
If the condition true, then add the transaction header line in the stage location. Otherwise skip the line.


Write the transaction header.


Assign the preTransactionNumber with last Transaction number


After the loop, read the entire header file and write to FTP location.


Integration flow:


Testing:

Source file:


Output:


Featured Post

11g to 12c OSB projects migration points

1. Export 11g OSB code and import in 12c Jdeveloper. Steps to import OSB project in Jdeveloper:   File⇾Import⇾Service Bus Resources⇾ Se...