Friday, July 8, 2022

OIC - File poll as trigger type using Connectivity agent | Oracle Integration Cloud

Usecase: Here, we will see how to poll a CSV comma separared file as trigger type using connectivity agent and write to another location.

Prerequisite:

Install the Connectivity agent to your system:

How to install follow my blogs:

To install in windows:

https://soalicious.blogspot.com/2022/05/oic-install-connectivity-agent-in.html

To install in unix system:

https://soalicious.blogspot.com/2020/11/oic-connectivity-agent-part-2.html


Steps in detail:

Create a File Connection with the agent configured.


Create a app driven orchestration style


Take a file trigger and configure to poll the file.


Take file connection to write file.


Map the polled file contents to write file.


Add Tracking.


Testing:

Test input file:

Once activated the integration, it will start listening the file and poll it, 

From monitoring >> integrations and tracking


File write done successfully.


The output file contents:


Parse an incoming EDI X12 document using Standalone mode | B2B for Oracle Integration

Here, we will see how to parse an Inbound EDI document to EDI XML data uaing B2B action in Standalone mode.

Steps in detail:

Navigation pane >> Integrations >> Create >> App driven Orchestration style


Configure the rest trigger 


Select the request payload format as Binary and mediatype : application/EDI-X12.


Select JSON sample as the response payload format.

Json payload:
{
"translate_result": "",
"hasError": false,
"validationErrors":"",
"translated_payload": ""
}


Configure the B2B Action
Standalone mode


Select the EDI document direction and data format.

Inbound EDI message to Oracle Integration message
EDI Message:
Document version: X12
Document version: 4010
Document type: 850
Document definition: Standard
EDI Character encoding: UTF8

Perform validations on input data: yes


Provide a sample data to test for translation.


Map the Stream response as encodeRefeferenceToBase64 format to edi-payload.


Map the Translate output
Edi-xml-document as get-content-as-string to Translated_payload
Tranlation-status to Translate_Result
Validation-errors-present to Has_errors
Validation-error-report to validation-errors


Add tracking.


Testing with 850 EDI data


Test Syntactical validations
In addition to translation, the B2B action also validates the EDI it recives and reports the error found.


Thursday, July 7, 2022

How to update FTP Receive Integration PostProcessing behaviors | update Integration properties values | B2B for Oracle Integration

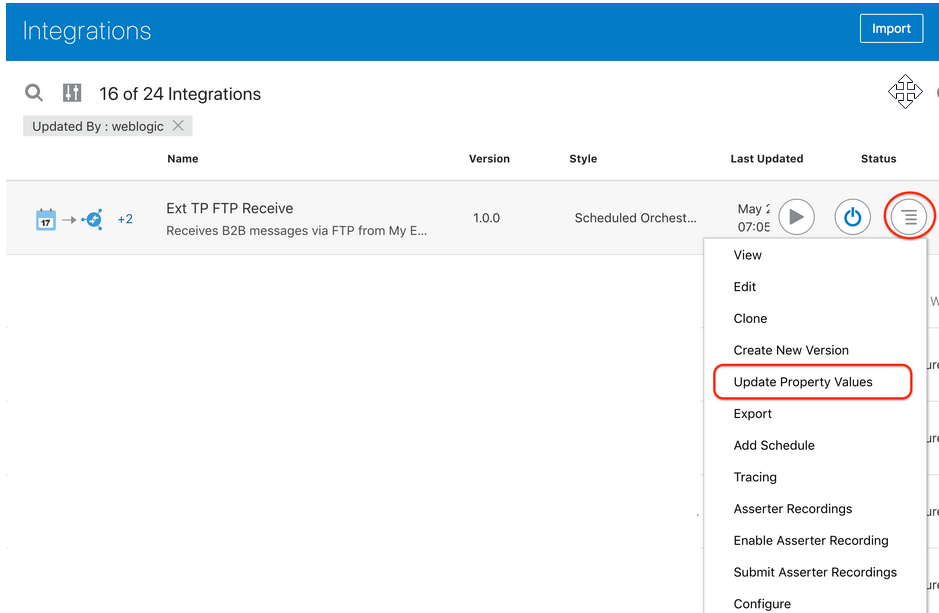
To change the behavior for one specific FTP transport, locate its FTP Receive Integration, and navigate to the Update Property Values dialog.

The Integrations page shows a search icon, filter icon, and number of integrations in the upper left. A table is displayed with columns for Name, Version, Style, Last Updated, and Status. At the far right, the actions menu is selected to show options for View, Edit, Clone, Create New Version, Update Property Values (which is selected), Export, Add Schedule, Tracing, Asserter Recordings, Enable Asserter Recording, Submit Asserter Recordings, and Configure. In the upper right is the Import button.

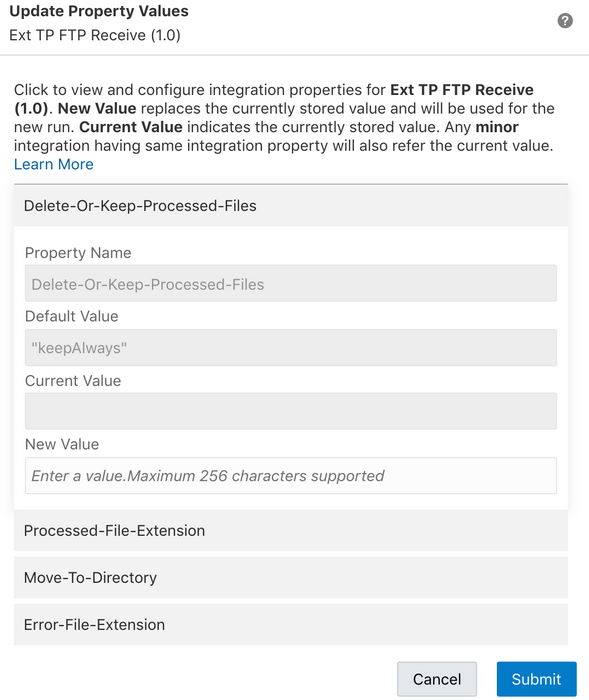
  1. In the Update Property Values dialog, select the property to change and enter a value in the New Value field.
  2. Select Submit to make the new values effective for future runs.
    The Update Property Values dialog is shown. From top to bottom are the Learn More link, the Property Name field, the Default Value field, Current Value field, and New Value field.

  3. To change the behavior for all transports created in the future, edit the integration named B2B Integration Template FTP Receive.
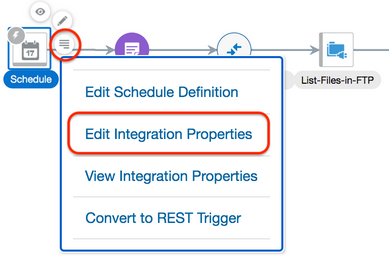
  4. In the schedule action in the integration canvas, select Edit Integration Properties and change the default values.
    The actions menu of the schedule is selected. The menu includes selections for Edit Schedule Definition, Edit Integration Properties (which is selected), View Integration Properties, and Convert to REST Trigger.

FTP Receive Integration PostProcessing Behavior | B2B for Oracle Integration

  • By default, files that are processed by the FTP Receive integration are moved to a backup directory. 
  • The backup directory name is assumed to be original-input-directory_backup.

We can customize this behavior as follows. To locate these properties, use the Update Property Values menu.
Following Permissions:
1. Delete-Or-Keep-Processed-Files: Controls whether processed files are retained or deleted.
  • deleteAlways: Deletes a processed file regardless of whether processing succeeded or failed.
  • keepOnError: Deletes a processed file only on success. If the processed file failed, the file is retained and moved to a different directory.
  • keepAlways: (default) Retains a processed file, regardless of whether processing succeeded or failed by moving it to a different directory.

2. Error-File-Extension : If a processing error occurs, rename the file by appending the Error-File-Extension value (for example, _error), depending on the Delete-Or-Keep-Processed-Files setting.

For example, if an input file name was 850_po.edi, then the default value after processing the file is renamed to 850_po.edi_error.

  • _error (default).
  • You can set the value for Error-File-Extension to any string. However, the combination of original-input-filenameError-File-Extension must result in a valid directory path on the FTP server.

3. Move-To-Directory: Processed files are moved to another directory depending on the Delete-Or-Keep-Processed-Files value. The backup directory is assumed to be original-input-directoryMove-To-Directory.

For example, if the input directory was /b2b/inbound, then with the default value, processed files are moved to the /b2b/inbound_backup directory.

  • _backup (default).
  • You can set the value for Move-To-Directory to any string. However, the combination of original-input-directoryMove-To-Directory must result in a valid directory path on the FTP server.
4. Processed-File-Extension: If processing is successful, rename the file by appending the Processed-File-Extension value (for example, _processed), depending on the Delete-Or-Keep-Processed-Files setting.

For example, if an input file name was 850_po.edi, then with the default value, after processing, the file is renamed to 850_po.edi_processed.

Create an Outbound Backend Integration | Outbound Message Processing | B2B for Oracle Integration

HighLevel steps for Outbound EDI Message Processing:


Create an Outbound Backend Integration:

Step1: Create an appdriven Integration and configure rest trigger connection.

In our example, a simple REST adapter is used. You can use any type of adpater like Oracle ERP adapter or any one.


Step2: Place a B2B action with an outbound translate operation.


Step3: Configure the mapper to convert the application message to B2B canonical format.

Part1:

  1. Map an element to either B2B Trading Partner Id or Application Partner Id. These elements are used to specify the trading partner to which to send. Here, B2B Trading partner has been mapped.
  2. Optionally mapped Application Message ID. This is the message id assigned by the backend application. If this is mapped, the value will be displayed in Monitoring>>B2B Tracking >> Business Messages 


Part2: 

Map the Backend application data to B2B canonical EDI data using edi-xml-document element.


Step3: Add a Check for Successful EDI Translation

Place a switch action after the B2B translate action. This action is to check the translation status if it is Succeeded or failed.

For success case condition used: translation-status="Success"


Step4: If translation is successful, deliver the document to the Send Outbound default Integration to Trading partner.

Add a local integration invoke action in the Translation succeeded route.


Step5: configure the mapper before the local Integration invoke 
  1. TranslateOutput>> B2B Message Reference >> b2b-message-reference
  2. TranslateOutput>>Trading Partner Name >> trading-partner
  3. TranslateOutput>>Connectivity-properties-code >> connectivityProperties >> LocalIntegration>>code
  4. TranslateOutput>>Connectivity-properties-version >> connectivityProperties >> LocalIntegration>>version

Step6: Add a rerurn acrion for success and a fault for an error.


Step7: Add B2B business identifiers for integration tracking.


Featured Post

11g to 12c OSB projects migration points

1. Export 11g OSB code and import in 12c Jdeveloper. Steps to import OSB project in Jdeveloper:   File⇾Import⇾Service Bus Resources⇾ Se...