Monday, November 20, 2023

ERP BI - Case Study 1 - Create EText EFT template based BI report | Create etext fixed position based BI Report

Usecase: We will create EFT template based or fixed position based BI report:

EFT template or layout:

https://docs.google.com/document/d/1HzqeSCsFBc8BO9m3bmGsaBXJqPul-a9n/edit?usp=drivesdk&ouid=105651791254983245041&rtpof=true&sd=true

Implementation Steps:

Step1: Create a Data model based on a Sql query:

Navigation Menu >> Tools >> Reports and Analytics >> Browse Catalog >> Create >> Data Model >> Click New Data Set >> SQL Query >> provide the SQl query and Dataset name >> ok >> go to data tab and view the data >> save as sample data >> export the xml data to see the structure and content. >> save the data model.

Sql query used: 

Select INVOICE_ID, INVOICE_NUM,INVOICE_AMOUNT,TO_CHAR(Invoice_date,'DD-MON-RRRR') Invoice_date

FROM AP_INVOICES_ALL

WHERE rownum <101


Step2: Based on the Exported xml data structure, create EFT delimiter based rtf doc and upload it to create a report >> Save >> view report

Note: Use the attached EFT template google drive link and copy and modifiy as per your need. SAVE it as .rtf file


ERP BI - Case study 1 - Create EDI template based BI report | Create Delimiter based report

Usecase: Here, we will create a BI report based on eText delimiter based rtf template or EDI template .

Delimiter template used:

https://docs.google.com/document/d/1Hvur9U0kmy9hCGw59OR_O8jePHNu2mkx/edit?usp=drivesdk&ouid=105651791254983245041&rtpof=true&sd=true


Implementation Steps:

Step1: Create a Data model based on a Sql query:

Navigation Menu >> Tools >> Reports and Analytics >> Browse Catalog >> Create >> Data Model >> Click New Data Set >> SQL Query >> provide the SQl query and Dataset name >> ok >> go to data tab and view the data >> save as sample data >> export the xml data to see the structure and content. >> save the data model.

Sql query used: 

Select INVOICE_ID, INVOICE_NUM,INVOICE_AMOUNT,TO_CHAR(Invoice_date,'DD-MON-RRRR') Invoice_date

FROM AP_INVOICES_ALL

WHERE rownum <101


Step2: Based on the Exported xml data structure, create EDI delimiter based rtf doc and upload it to create a report >> Save >> view report

Note: Use the attached EDI template google drive link and copy and modifiy as per your need. Save it as .rtf file.


Another example of Delimiter Based eText Report:

Step1: First create a Data model based on a SQL Query for instance, "Generate_invoice_id".

For steps follow - oic-how-to-create-bi-report-in-oracle

SQL Query used: select AP_INVOICES_S.nextval invoice_id from dual

type of SQL: standard

data source: ApplicationDB_FSCM

Name: apt name.

Step2: Create a RTF template file. To begin with, Copy trailing content and save it as Delimetr_eText.rtf.

Delimiter Format Setup:


Format Setup:

Hint: Define formatting options...


<TEMPLATE TYPE>

DELIMITER_BASED

<OUTPUT CHARACTER SET>

iso-8859-1

<CASE CONVERSION>

UPPER

<NEW RECORD CHARACTER>

Carriage Return


Hint: Format Data Records Table for DELIMITER_BASED


<LEVEL>

DATA_DS

<MAXIMUMLENGTH>

<FORMAT>

<DATA>

<COMMENTS>

<NEW RECORD>

InvoiceHeader

250

Alpha

'Invoice_id'


<LEVEL>

G_1

<MAXIMUMLENGTH>

<FORMAT>

<DATA>

<COMMENTS>

<NEW RECORD>

CLRDAta

250

Alpha

INVOICE_ID


<END LEVEL>

G_1


<END LEVEL>

DATA_DS


Step3: Create a BIP report with the above Data model (ref point 1) , upload Delimetr_eText.rtf  file with template type as eText.

Execute the Report. You might expect outcome as below:

invoice_id

12345


Thursday, November 16, 2023

OIC - Import (Replace) a Lookup | Update an existing OIC Lookup based on base64 encoded CSV file as rest feed

Usecase: We have a requiremwnt that we will create a reusable integration which will take input as lookup name and base64 encoded csv content and update or replace the OIC lookup based on that CSV file.

Logic steps:

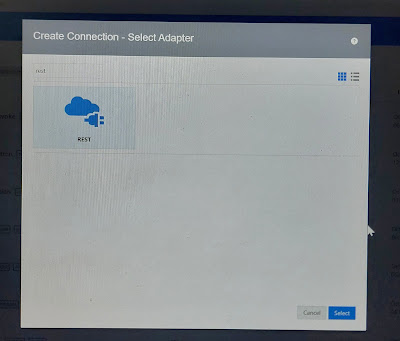
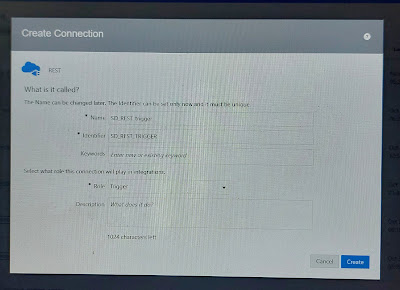
  1. Create 2 connections
    1. Rest trigger connection
    2. OIC Rest invoke connection for oic lookup update rest api call
  2. Create an app driven orchestration style
  3. Configure rest trigger with the following:
    1.  Request: 
      1. Base64 encoded csv content
      2. Lookup name
    2. Response:
      1. jobStatus
      2. Exception code, reasona and details
  4. Assign globals 
    1. Content: decodeBase64ToReference(base64StreamRef)
    2. Exception code, reason, details and result variables
  5. Take a scope and drag and drop created oic rest invoke connection and configure to update the lookup
    1. Api: /ic/api/integration/v1/lookups/archive
    2. Verb: Put
    3. Request: Multipart/form-data
    4. Response: binary , other media type: application/json; charset=utf-8
  6. Map the following:
    1. AttatchmentReference : content
    2. contentType: applocation/octet-stream
    3. partName: lookupname + ".csv"
    4. fileInputHtmlFieldName : file
  7. Go to default fault handler and assign the scope fault details and result as "UPDATE_ERROR"
  8. Assign the final response.

Rest trigger Request json:
{
"base64StreamRef":"ref",
"lookupName":""
}

Rest trigger Response Json:
{
"jobStatus":"",
"jobMessage":"",
"exceptionCode":"",
"exceptionReason":"",
"exceptionDetails":""
}

Detailed steps with screenshots:

Create OIC Rest connection:


Create a rest trigger connection:


Create an app driven integration and configure the Rest trigger


Take a scope and configure OIC rest invoke adapter to update lookup


Assign global 
Content as decodebase64ToReference
Different exception details variables


Map the required details to update the lookup


Map the exception details in default handler


Do the final response mapping.


Add tracking and activate.

Create a lookup


Export the lookup file


Update the lookup file.


Test the file


We can see that the lookup has been updated.


Test with wrong file details and see the exception details in formatted manner.


Note: this is to update or replace existing lookup. To import new lookup file, use rest verb as post instead of put.

Friday, November 10, 2023

About Sample AP Invoice Source file structure

Here, We will discuss about an AP Standard Invoice source file structure and about the fields which are required to import to ERP


Source file Row types: The source file has 3 types of records: Header, Line and Trailer.

INVOICE HEADER FIELDS

INVOICE LINE FIELDS

INVOICE TRAILER FIELDS

INVOICE HEADER

INVOICE LINE 1

INVOICE LINE2

INVOICE HEADER

INVOICE LINE1

INVOICE 2

...

INVOICE TRAILER


Invoice Source file example: The highlighted fields are mainly required

Invoice,InvoiceNumber,Supplier Name, Supplier Number, Status, Invoice Date, Submit for Approval?,Handling Amount, Misc Amount, Shipping Amount, Line Level Taxation, Tax amount, Tax Rate,Tax Code, Supplier Note, Payment Terms, Shipping Terms, Chart of Accounts, Currency, Contract Number,Image Scan FileName, Image Scan URL, Taxes In Origin Country Currency  Delivery Number, Delivery Date, Ship To Name, Ship To Id, Ship To Attention, Ship To Street1,Ship To Street2, Ship To City,Ship To State,Ship To Postal Code,Ship to Country Code,Ship to Country Name,Bill To Address Id,Bill to address Legal Entity Name,Bill to address Street, Bill To Address City, Bill To Address Postal Code,Bill To Address Country Code, Remit To Address Street1,Remit to address Street2,Remit To address City, Remit to address state, Remit to address postal code,Remit to address Country code,Remit to code,Remit to Tax Prefix,Remit to tax number,Remit to tax country code,Original Invoice number,Original Invoice date, Is Credit Note, Attachment 1, Attachment 2,Attachment 3 , Attachment 4, Attachment 5,Attachment 6, Attachment 7, Attachment 8, Attachment 9, Attachment 10

Invoice Line,Invoice Number,Supplier Name,Supplier Number, Line Number,Description,Supplier Part Number, Price, Quantity, Line Tax Amount,Line Tax Rate,Line Tax Code,Line Tax Location,Line Tax Description,Line Tax Supply Date,Unit of Measures,PO Numner, PO Line Number, Account Name, Account Code, Account Segement 1, Account Segment 2, Account Segment 3, Account Segment 4, Account Segment 4, Account Segment 5, Account Segment 6, Account Segment 7, Account Segment 8, Account Segment 9, Account Segment 10, Account Segment 11, Account Segment 12, Account Segment 13, Account Segment 14, Account Segment 15, Account Segment 16, Account Segment 17, Account Segment 18, Account Segment 19, Account Segment 20,Account Allocation Amount, Account Allocation Percent, Budget period Name, Net Weight , Weight UOM, Price Per Weight

Invoice Trailer,Invoice Count,Total Amount

"Invoice","001","",000123","Approved","2023-10-17T19:00:00-05:00","N","1000.00","","","No","","","","Suppler Note","","","ABC","USD",.....

"Invoice Line","001","","000123","1","Description","","1000.00","001","","","","","","","EA","","","","501-12345-511234-"....

"Invoice Tralier","1","1000.00"


Why do we need COA lookup:

For some segment like Company name , source team represents it like "ABC" which Oracle understands as "101" and etc. , this type of domain value maps, we need to create a lookup in OIC to map the source value to Oracle specific target values.


For the above file invoice, a distribution combination created as below:

501-511234-12345-00-L-000-0000000-XX-0000-00000-00-000-0000-0000

Distribution Combination provides analysis by the account combination on the transaction distribution that represents a monetary transaction.


Important points: 

  • A Source file contains 3 types of records: Header, Line and Trailer.
  • One invoice has two parts: Header and Line. 
  • Each Invoice can have multiple lines
  • Invoice header has invoice number, supplier number, invoice approval status, invoice date, total handling invoice amount, supplier note, COA, currency details
  • Invoice line have similar information like header plus line level invoice break ups.
  • Tralier contains the total invoice counts and total invoice amount which are required for validation.
  • Using the invoice line Account code, distribution combination needs to be created.


Featured Post

11g to 12c OSB projects migration points

1. Export 11g OSB code and import in 12c Jdeveloper. Steps to import OSB project in Jdeveloper:   File⇾Import⇾Service Bus Resources⇾ Se...