Tuesday, December 31, 2024

OIC - Can we use/call plsql in OIC xslt for complex logic processing?

No, we cannot directly call PL/SQL within XSLT or use it for complex logic processing in Oracle Integration Cloud (OIC). However, there are workarounds to achieve this indirectly:

1. Use a REST/SOAP API to Call PL/SQL:

Expose your PL/SQL procedure or function as a REST or SOAP service from your Oracle database.

In OIC, you can invoke this service as part of your integration logic.

2. Invoke PL/SQL Using Database Adapter:

OIC provides a Database Adapter that allows you to call stored procedures or execute queries directly against your database.

This is an efficient way to leverage PL/SQL logic in your integrations.

3. Embed Complex Logic in XSLT (Limited):

While XSLT supports conditional processing and basic logic (using if, choose, etc.), it’s not designed for complex operations.

For anything beyond formatting or basic transformations, offload the logic to PL/SQL via a service or adapter.

4. Use Custom Functions or Scripts:

In scenarios where custom logic is necessary, consider JavaScript or Groovy scripting within OIC integrations, but these cannot directly call PL/SQL either. They can, however, manipulate the data post-PL/SQL call.

Recommendation:

For complex logic, it's best to keep it within the database using PL/SQL and expose the required operations via a service. Use OIC to orchestrate and connect the services, ensuring a clean separation of concerns.

Monday, December 30, 2024

OIC - Commonly Used XSLT Functions in Oracle Integration Cloud (OIC)

In Oracle Integration Cloud (OIC), the most commonly used XSLT functions are primarily focused on transforming, filtering, and manipulating XML data. Here's a list of the most widely used XSLT functions:

1. string()

Converts a value to a string.

Example:

<xsl:value-of select="string(123)"/>

2. concat()

Concatenates multiple strings together.

Example:

<xsl:value-of select="concat('Hello ', 'World')"/>

3. substring()

Extracts a substring from a string.

Example:

<xsl:value-of select="substring('Hello', 1, 3)"/>

4. contains()

Checks if a string contains a specified substring.

Example:

<xsl:value-of select="contains('Hello World', 'World')"/>

5. starts-with()

Checks if a string starts with a specified substring.

Example:

<xsl:value-of select="starts-with('Hello', 'Hel')"/>

6. normalize-space()

Removes leading and trailing whitespace and replaces sequences of whitespace characters with a single space.

Example:

<xsl:value-of select="normalize-space('  Hello    World  ')"/>

7. substring-before()

Returns the part of the string before the first occurrence of a specified substring.

Example:

<xsl:value-of select="substring-before('Hello World', ' ')"/>

8. substring-after()

Returns the part of the string after the first occurrence of a specified substring.

Example:

<xsl:value-of select="substring-after('Hello World', ' ')"/>

9. translate()

Replaces characters in a string according to a mapping.

Example:

<xsl:value-of select="translate('abcABC', 'abc', '123')"/>

10. number()

Converts a value to a number.

Example:

<xsl:value-of select="number('123')"/>

11. format-number()

Formats a number according to a specified pattern.

Example:

<xsl:value-of select="format-number(12345.678, '#,##0.00')"/>

12. string-length()

Usage: Returns the length of a string.

Example:

<xsl:value-of select="string-length('Hello World')"/>

13. upper-case() / lower-case()

Usage: Converts a string to uppercase or lowercase.

Example:

<xsl:value-of select="upper-case('hello')"/>

14. sum()

Usage: Returns the sum of numeric values in a node-set.

Example:

<xsl:value-of select="sum(/root/item/price)"/>

15. key()

Usage: Retrieves nodes from a key value pair, often used for fast lookups.

Example:

<xsl:value-of select="key('mykey', 'keyname')"/>

16. format-dateTime()

Usage: Formats a date-time value in a specified pattern.

Example:

<xsl:value-of select="format-dateTime(current-dateTime(), '[Y0001]-[M01]-[D01]')"/>

These functions are essential for transforming data in OIC, especially when handling XML data. They allow for dynamic manipulation of string, numeric, date, and node-set data, making XSLT a powerful tool in integration scenarios.


OIC - How to Avoid Storing Duplicate Data in a Database When Integrating ERP with Oracle Integration Cloud (OIC)

To avoid storing duplicate data when integrating ERP data into a database using Oracle Integration Cloud (OIC), follow these steps:

1. Use Unique Identifiers: Ensure the ERP data contains a unique identifier (e.g., invoice number or order ID).

2. Check for Existing Records: Before inserting data into the database, query the table to check if a record with the same identifier already exists. Use SQL like:

SELECT COUNT(*) FROM table WHERE identifier = :identifier

3. Conditional Insert/Update:

if no record exists, insert the new data.

If a record exists, skip the insert or update the existing record using an upsert (merge) operation.

4. Data Mapping: Use OIC’s data mapping to filter out duplicates before inserting data.

5. Transaction Management: Handle database transactions and retries to ensure consistency and avoid duplicate inserts.

This approach ensures that only unique records are inserted, preventing data duplication in the database.


OIC - Handling Null or Empty BIP Report Files in Oracle Integration Cloud to Prevent Flow to Downstream Applications

To handle empty files or files with headers but no data in Oracle Integration Cloud (OIC), follow these steps:

1. Handling Empty Files (Size = 0):

Check File Size: After invoking the BIP report, check if the file size is zero. If the file size is zero, it means the file is empty.

Action: If the file is empty (size = 0), throw a fault to prevent processing or send a notification to alert stakeholders that the file is empty.

2. Handling Files with Header but No Data:

Check File Content: If the file contains a header but no actual data rows (i.e., only the header is present), you need to read the file content.

Action: Parse the file to count the number of rows (excluding the header). If the row count is less than 2 (meaning only the header is present), throw a fault or apply a skip condition to prevent further processing.

By implementing these steps, you ensure that only valid files with data are processed, and empty or incomplete files are handled appropriately to avoid unnecessary downstream processing.


OIC - Enrichment Service in Oracle Integration Cloud (OIC)

Enrichment Service in Oracle Integration Cloud (OIC)

The Enrichment Service in Oracle Integration Cloud (OIC) allows you to enhance the data being processed within your integrations by adding additional information from external systems or by transforming the data in meaningful ways. This is typically used to improve the quality or completeness of the data as it flows between systems.

Use Cases for Enrichment Service

  1. Data Augmentation: Add additional information from external data sources (e.g., CRM, ERP, or third-party APIs) to enrich the business data in your integrations. For example, enriching customer records with the latest social media data or financial details.
  2. Lookups and Data Transformation: Use enrichment to perform lookups (e.g., get product details based on a product ID) or to transform the format of the data (e.g., convert currencies, calculate discounts).
  3. Enhance Business Processes: Streamline business processes by ensuring that each data record is as complete and accurate as possible before it's passed on to downstream systems.

How to Configure Enrichment in OIC

  1. Create Integration: In the OIC console, create a new integration or modify an existing integration to include the enrichment logic.
  2. Add Enrichment Stage: In the integration flow, add an Enrichment stage.
  3. Lookup: Use lookups to pull additional data from sources like databases, RESTful APIs, or SOAP web services.
  4. Data Transformation: Use mapping functions to transform or enrich the incoming data. For example, you might use a mapping function to combine customer details with product data.
  5. Define Data Sources: Define the external data sources or services from which the enrichment data will be fetched (like Oracle Cloud Services, on-prem systems, or third-party APIs).
  6. Use Enriched Data: Once the data is enriched, it can be used in subsequent steps in the integration process (e.g., sending enriched data to an external system, updating records in the source system).

Example of Enrichment Service in Action

  1. Customer Data Enrichment: A company integrates OIC with a third-party address verification service to enhance customer addresses. The integration retrieves the correct address format (street name, postal code) from the external service and uses this data to update the CRM system.
  2. Currency Conversion: In a global e-commerce integration, OIC could use an enrichment service to fetch real-time currency exchange rates and apply the correct conversion to customer orders, ensuring accurate pricing in different currencies.

Benefits of Using Enrichment Service

  1. Improved Data Quality: Ensure that the data used in downstream processes is complete and accurate.
  2. Automation: Reduce manual work by automating data augmentation from external sources.
  3. Faster Decision Making: With enriched and real-time data, businesses can make more informed decisions.
  4. Cost Efficiency: Prevent errors or rework that might arise from incomplete or outdated data.


OIC - Resubmit Failed Messages

Resubmit Failed Messages

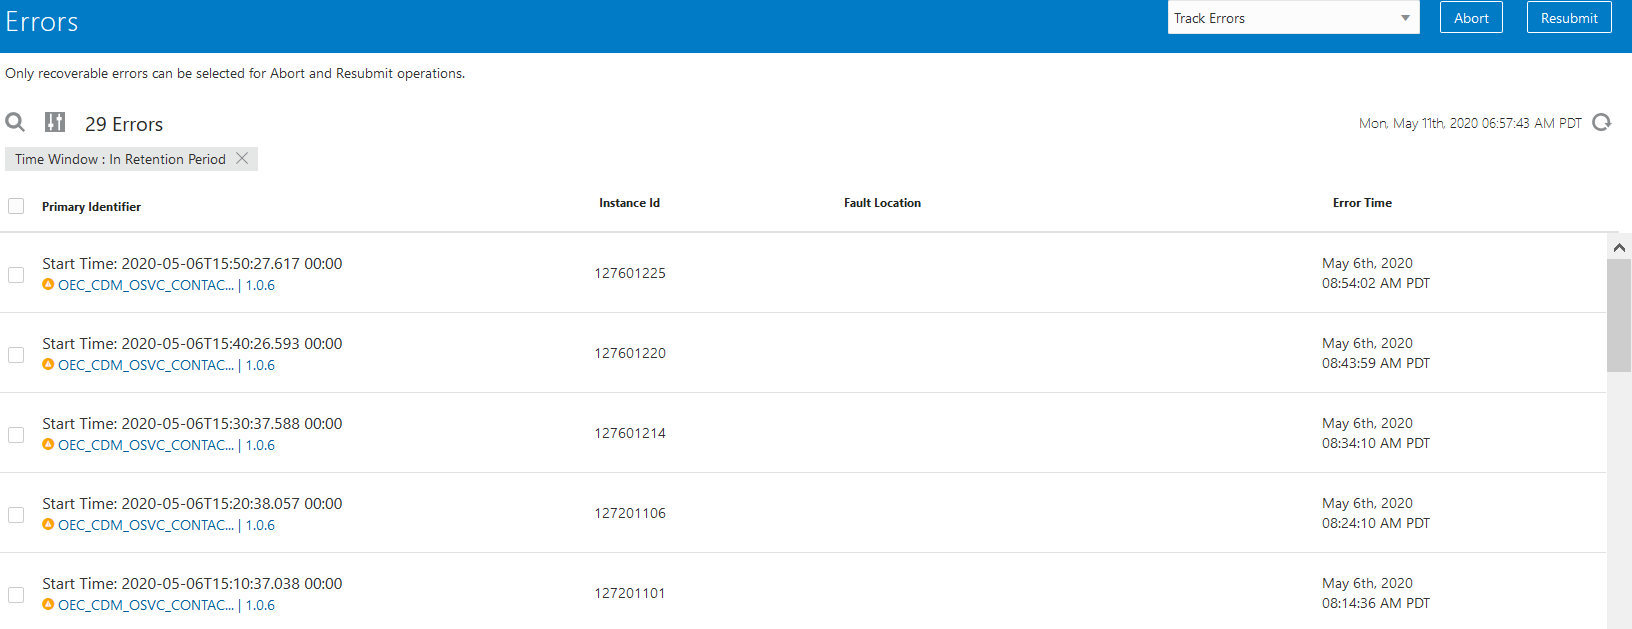
We can manually resubmit failed messages. If a local scope has been defined in the integration, resubmission starts at the local scope level. Otherwise, resubmission starts from the beginning of the integration. Oracle Integration does not automatically resubmit failed messages.

All faulted instances in asynchronous flows in Oracle Integration are recoverable and can be resubmitted. Synchronous flows cannot be resubmitted. You can resubmit errors in the following ways:
  • Single failed message resubmissions

  • Bulk failed message resubmissions

Error instances that are resubmitted and successfully resolved are removed from the error list. If an instance is resubmitted and is in progress, a state of In Progress is displayed in the list. During this state, additional resubmits of this error instance are not permitted.

To resubmit failed messages:

  1. In the left navigation pane, click Home > Monitoring > Integrations > Errors.

  2. From the Filters icon link, select the time period or retention period during which to search for integration errors.


    Description of errors_page.png follows


  3. Resubmit errors in either of two ways:

    1. Select the check boxes of errors to resubmit together.

    2. Click Resubmit in the upper right corner.

    or

    1. Go to the row of the specific error to resubmit.

    2. Click Resubmit icon.

    A message is displayed at the top of the page:

OIC - Versioning in Oracle Integration Cloud (OIC) - Generation 3

Versioning in Oracle Integration Cloud (OIC) - Generation 3

In OIC Generation 3, versioning follows a three-part format:

1. Major Version:

Indicates significant changes or new functionality that may introduce breaking changes.

Example: Moving from 01.x.x to 02.x.x.

Two major versions can be active simultaneously, allowing phased rollouts or parallel use.

 2. Minor Version:

Represents backward-compatible updates or new features.

Example: Moving from 01.00.x to 01.01.x.

Only one minor version can be active at a time within a major version.

3. Patch Version:

Used for small fixes or non-breaking changes.

Example: Moving from 01.00.0000 to 01.00.0001.

Only one patch version can be active at a time within a minor version.

Key Features

Multiple Active Versions: Two major versions can be active simultaneously, but only one minor or patch version is allowed per major version.

Draft and Active States: Draft versions are used for testing and updates, while active versions are used in production.

Version History: Previous versions are retained for rollback if needed.

Testing and Deployment: Draft versions are isolated for testing without affecting active versions.


This flexible versioning approach ensures seamless updates, backward compatibility, and controlled multi-version management.


OIC - Using REST API vs ERP Cloud Adapter in FBDI Import

REST API vs ERP Cloud Adapter in FBDI Import

  1. Definition: REST API allows direct interaction with Oracle ERP Cloud using HTTP methods, while ERP Cloud Adapter is a prebuilt integration adapter in Oracle Integration Cloud (OIC).
  2. Ease of Use: REST API requires development knowledge like JSON payloads and endpoint management, whereas ERP Cloud Adapter simplifies integration through configuration with minimal coding.
  3. Integration Approach: REST API involves custom coding and manual endpoint management, while ERP Cloud Adapter provides pre-configured mechanisms for FBDI import.
  4. Automation: REST API requires manual setup for automation, but ERP Cloud Adapter offers built-in automation for FBDI imports.
  5. Error Handling: REST API requires custom error handling, while ERP Cloud Adapter includes built-in error tracking and handling features.
  6. Performance: REST API is better for lightweight integrations, while ERP Cloud Adapter is optimized for complex or large-scale processes.
  7. Learning Curve: REST API requires knowledge of REST frameworks, while ERP Cloud Adapter is easier for functional users familiar with OIC.
  8. Scalability: REST API scalability depends on custom logic, whereas ERP Cloud Adapter scales seamlessly with OIC.
  9. Cost: REST API has minimal licensing costs but higher development effort, while ERP Cloud Adapter requires OIC licensing, increasing overall cost.

Conclusion

While both REST API and ERP Cloud Adapter can facilitate FBDI imports, the choice depends on your requirements. REST API is ideal for lightweight, custom integrations with lower upfront costs but requires significant development effort. On the other hand, ERP Cloud Adapter simplifies integration with prebuilt automation and error handling, making it more suitable for complex, large-scale processes, though it requires an OIC license.


Friday, December 27, 2024

OIC - Oracle Integration-Bulk load into Oracle ATP OR Oracle ADW

Oracle Integration enhances its database adapters, including Oracle Autonomous Transaction Processing (ATP) and Autonomous Data Warehouse (ADW) Adapters, to support native bulk load operations. Leveraging Oracle Autonomous database and OCI features, these enhancements significantly boost performance.

A typical use case involves importing bulk data by retrieving a file (e.g., from an FTP server or HCM system), placing it in object storage, and loading its contents into an ATP-S database. Oracle Integration can also reformat files (e.g., XML or JSON) into the database's required format, such as CSV.

To implement the integration flow:

  1. Create an App Driven Orchestration or Schedule Based Orchestration based on the requirement.
  2. Download the file from the FTP location to the staging area.
  3. Use the Oracle Autonomous Transaction Processing Adapter or Autonomous Data Warehouse Adapter as per your database instance.
  4. In the adapter wizard:
    1. Select Perform bulk data import operation.
    2. Choose the OCI Bucket and enable Delete file from object storage after operation completion.
    3. Edit Copy data format options, select the file format, schema, table, and columns. Ensure the columns align with the incoming data order.


Reference:

https://blogs.oracle.com/integration/post/oracle-integration-bulk-load-into-oracle-atp-or-oracle-adw


OIC - Convert a package to a project

To convert a user-developed package into a project in Oracle Integration:
  1. Navigate to Design > Packages.
  2. Hover over the package to convert (accelerator and recipe packages are not eligible).
  3. Click the Actions icon and select Create Project.
  4. Enter a name, keywords, and an optional description.
  5. Choose whether to allow anyone to edit, view, and monitor resources by selecting or leaving the corresponding checkbox unchecked.
  6. Click Create. A message confirms the project creation and provides a link to access it.

The newly created project includes all resources (integrations, connections, lookups, and JavaScript libraries) from the package, leaving the original package unchanged.
Screenshots:


Thursday, December 26, 2024

OIC - Restrictions on Using Stage File Action Operations with the File/Attachment Features of the Connectivity Agent

Restrictions on Using Stage File Action Operations with the File/Attachment Features of the Connectivity Agent

When configuring the stage file action in the Configure Stage File Action wizard, note that there are restrictions on using some operations with the connectivity agent.
  • List File operation: Files uploaded through the connectivity agent are not available with the List File operation.
  • Read Entire File and Read File in Segments operations: Files uploaded through the connectivity agent can only be read with a file reference.
  • Zip File operation: Files uploaded through the connectivity agent are not available with the Zip File operation.
  • Unzip File operation: Files uploaded through the connectivity agent can only be unzipped using a file reference.
Reference:

OIC - "Dynamically Configuring Relative URLs for REST API Invocations in Oracle Integration Cloud" | Dynamically invoke local integration

Use Case:

In Oracle Integration Cloud (OIC), there is often a need to dynamically determine the Relative URI while invoking REST APIs. This is particularly useful in scenarios where integration flows must interact with multiple endpoints or services based on dynamic parameters, such as job names, document IDs, or other runtime variables.

Example Scenario:

A bulk data export integration requires a lookup of specific job names and their corresponding endpoint URIs dynamically during runtime. The target REST API expects the Relative URI to change based on the job being processed, ensuring the correct endpoint is invoked.

Solution:

To achieve this, you can use the lookupValue function within the OIC mapper to resolve the required Relative URI dynamically. Here's how:

1. Setup a Lookup Table in OIC:

Create a lookup table in OIC with columns for "Job Name" and "Integration URL". Populate the lookup with key-value pairs for job names and their corresponding relative URIs.

2. Configure the Mapper:

In the mapper, map the required source variable (e.g., Var_JobName) to the target Relative URI field.

Use the lookupValue function to fetch the URI dynamically based on the job name.

Syntax:

lookupValue("Lookup_Name", "JobName", Var_JobName, "IntegrationURL", "Default_Value")


The dynamic uri which we will be passing from lookup , is as below format:
/ic/api/integration/v1/flows/rest/<integrationIdentifier>/1.0/

Limitation:
All the REST APIs being invoked dynamically must have the same request and response payload structures to ensure seamless mapping and processing in the integration.

Invoke local Integration
The same functionality can be achieved using the "Invoke Local Integration" action when calling multiple local integrations. However, this requires all the local integrations to share the same request and response payload structures for consistent processing.

We have to pass integration code(identifier)and version dynamically from the lookup.


Wednesday, December 25, 2024

OIC - How to add days to date YYYY-MM-DD using prebuilt functions

Use Case: 

Adding a Specific Number of Days to a Database Fetched Date in the Format YYYY-MM-DD

Logic Steps:

  1. Convert the input date (in YYYY-MM-DD format) to a date object using the date() function.
  2. Add the required number of days using the dayTimeDuration("P10D") function (e.g., for 100 days, use "P100D").
  3. Finally, convert the result back to a string using the string() function.

Solution :

string((xsd:date(/nstrgmpr:execute/ns20:request-wrapper/ns20:inputDate) + xsd:dayTimeDuration("P10D")))


Tuesday, December 24, 2024

OIC - Javascript - How to add days to a date (YYYY-MM-DD) format.

Use Case:

This function demonstrates how to add a specific number of days to a date provided in the YYYY-MM-DD format.

Javascript code used:

function addDays(startDate, daysToAdd) {

    // Convert startDate to a Date object

    const rhDate = new Date(startDate.slice(0, 4), startDate.slice(5, 6) - 1, startDate.slice(8));

    rhDate.setDate(rhDate.getDate() + Number(daysToAdd));

    // Format the derived date as YYYY-MM-DD

    const derivedDate = rhDate.getFullYear() + '-' + ('0' + (rhDate.getMonth() + 1)).slice(-2) + '-' + ('0' + rhDate.getDate()).slice(-2);

  return derivedDate;

}

Javascript code snap:


Screeshots:

Flow:


Configure the trigger to take two inputs and one output.


Take the custom defined function and add date and days parameters.

Test:


Monday, December 23, 2024

OIC - Managing Sequence Numbers using lookup in OIC for Dynamic Target File Naming

Use Case:

We have a requirement to create a unique file name by appending the following components:

  • A sequence number retrieved dynamically.
  • A hardcoded value '00000000'.
  • A Hong Kong time-converted timestamp in the format [Y0001][M01][D01][H01][m01][s01].

Solution:

Maintain Sequence Numbers Using a Lookup Table:

  • Create a lookup table (e.g., SCM_INVENTORY_TRANSACTION_SEQ_Lookup) with an initial sequence number.
  • Use the dvm:lookupValue function to retrieve the current sequence number dynamically during integration runtime.
Create a Reusable Integration to Update the Lookup:

  • Develop a reusable integration to increment the sequence number in the lookup by 1 after each successful integration execution.
  • This ensures the sequence number is unique and incremented only when the integration runs successfully.

Generate the Timestamp:

  • Use the ns99:format-dateTime function with the Hong Kong timezone to convert the current datetime into the required format:[Y0001][M01][D01][H01][m01][s01].

Concatenate the Components:

  • Combine the sequence number, hardcoded value '00000000', and the formatted timestamp to generate the unique file name.

Example file name format:

<FileNamePrefix_FirstPeriod>_<SequenceNumber>_<Timestamp>.dat


Solution codes:

Var_DatetimeStamp

ns99:format-dateTime(fn:adjust-dateTime-to-timezone(fn:current-dateTime(),ns0:dayTimeDuration("PT08H00M")), '[Y0001][M01][D01][H01][m01][s01]')

var_runno

fn:concat("00000000",dvm:lookupValue('SCM_INVENTORY_TRANSACTION_SEQ_Lookup', 'INT_ID', $var_interfaceID, 'SEQ', 'NA'))

Var_TargetFileName

concat(dvm:lookupValue('Common_SCM_Interface_Outbound_Lookup','Integration_Id', $var_interfaceID, 'FileNamePrefix_FirstPeriod', 'NA'),$var_runno,'_', $Var_DatetimeStamp,'.dat')

Lookup API and Request payload details:

API: /ic/api/integration/v1/lookups/{name}

verb: PUT

request:

{

"columns": [ "rightnow", "soap" ],

  "rows": [

    {

      "rowData": [   "RN1",   "SOAP1"  ]

    }, {

      "rowData": [    "RN2",   "SOAP2"    ]

    }  ],

  "name": "myLookup"

}

Absolute Endpoint URI:

concat("https://design.integration.ap-region-1.ocp.oraclecloud.com/ic/api/integration/v1/lookups/",<LookpuName>,"?integrationInstance=",<ServiceInstanceNameFromintegrationMetadata>)

Trigger request and response json payloads:

Request:

"ProcessRequest" : {

    "Metadata" : {

        "ParentProcessId" : "123456",

        "Interface_Id" : "INT_XXX_XX_XXXX",

        "ParentProcessStartDateTime" : "2019-09-06T12:41:48.589+00:00",

    },

    "ProcessDetails" : {

        "LookUpName" : "VAL1",

        "SourceColumnName" : "VAL2",

        "TargetColumnName" : "VAL3",

        "SourceColumnValue" : "VAL4",

        "TargetColumnValue" : "VAL5"

    },

    "GenericParameters" : [

        {

            "ParameterName" : "KEY1",

            "ParameterValue" : "VAL2"

        },

        {

            "ParameterName" : "KEY2",

            "ParameterValue" : "VAL2"

        },

        {

            "ParameterName" : "KEY2",

            "ParameterValue" : "VAL2"

        }

    ]

}

Response:

"ProcessResponse" : {

    "Status" : "YES",

    "ProcessDetails" : {

        "LookUpName" : "VAL1",

        "SourceColumn" : "VAL2",

        "TargetColumn" : "VAL3",

        "SourceValue" : "VAL4",

        "TargetValue" : "VAL5"

    }

}

Reference:

https://docs.oracle.com/en/cloud/paas/integration-cloud/rest-api/op-ic-api-integration-v1-lookups-name-put.html

Screenshots for creating reusable lookup update integration:

Integration flow:

Configure trigger request - response.


Configure lookup update API


Map

Test:


OIC - Seamless Integration: SCM to SAP EFMS Inventory Transactions Flow

Usecase:

Here, we will see how to integrate between SCM and SAP applications for inventory transactions.

This flow consists of following integrations:

  1. Scheduler:<InterfaceNumber>_OracleSCMToEFMS_Inventory_Transaction_SCH
    • this will call custom ess job by passing 2 params: datefrom and dateTo. 
    • OIC will use the last successful run date timestamp as the date from and the current date timestamp as the dateto for the data extraction. 
    • It will call the export bulk data process to trigger the BIP to extract the inventory transaction data.
  1. Common:SCM_Common_Interface_Outbound_Callback
    • Callback will be triggered upon the completion of the ESS job by the ERP cloud. This callback will be subscribed by this callback process.
    • This service will feed the job details to the main process.
  2. Main:<InterfaceNumber>_OracleSCMToEFMS_Inventory_Transaction_Main:
    • Decode the data from base64 and tramsform the inventory transaction data
    • Transform the data into fixed length file.
    • Prepare imventrory transaction target file into EFMS format by addig header and trailer.

Scheduler service:
  1. Schedule parameters: 
    1. ToDate : format: YYYY-MM-DD HH:MM:SS
    2. DateFrom : format: YYYY-MM-DD HH:MM:SS
  2. Assign dateTo: format-dateTime(startTime,'[Y0001]-[M01]-[D01] [H01]:[m01]:[s01]')
  3. Invoke erp cloud adapter and configure:
    1. Query create update or delete info
    2. Services - ErpIntegrationService
    3. Operation: exportBulkData
  4. Take a switch and Map erp export bulk data as below
    1. If ToDate = " map as
      1. Job name: /oracle/apps/ess/custom/Procurement/InventoryTransaction,InventoryTransactionSyncToEfms
      2. Param list: Orgcode,#NULL,#NULL,dateFrom,dateTo
      3. Job options: EnableEvent=Y
    2. Else map as below:
      1. Job name: /oracle/apps/ess/custom/Procurement/InventoryTransaction,InventoryTransactionSyncToEfms
      2. Param list: Orgcode,#NULL,#NULL,dateFrom,ToDate
      3. Job options: EnableEvent=Y
  5. Assign params:
    1. dateFrom = $dateTo
    2. toDate = ''
  6. If any error, throw new fault : key as ESSJOBERROR" using lookup where error code and reason is stored. Details van be fetched from the scope fault object.
  7. In the global fault, we are passing error details to Saas app data dog .
Common service:
  1. Subscribe the event
    1. Receive business events raised within ERP Cloud
    2. ERP Integration Outbound Event
    3. Add filter like <xpathExpr xmns:ns0="http://xmlns.oracle.com/apps/financials/commonModules/shared"> $inputVariable/ns0:JOBS[1]/ns0:JOBNAME='Inventory Transaction Sync To EFMS' or ... </xpathExpr>
  2. Assign job name to a variable Var_JobName: /ns15:onEvent/ns9:ErpExportBulkDataEvent/ns9:JOBS[1]/ns9:JOBNAME
  3. Validation: throw new fault - ESSJOBSTATUSFAILED where skip condition : summarystatus='SUCCEEDED'
  4. Invoke main integration and map the following info:
    1. SummaryStatus
    2. DocumentId
    3. Jobs details
    4. Connection properties >> relativeURI: get relative uri based on job name from lookup.
  5. If any error, In the scope fault handle >> throw new fault  - LOCALINTEGRATIONERROR
Main integration:
  1. Call erp cloud adapter and getDocumentForDocumentId - ERPIntegrationService and map subscribed event Document id
  2. Write the content to stage as opaque element using xsd opaque schema.
  3. Unzip the file using stage
  4. For each unzipped ICS File
    1. Take switch and check if filetype = 'csv'
    2. Read the csv file using stage
    3. Write target file to FTP location. It has 3 sections.
      1. Header
      2. Data set
      3. Footer

Screenshots:

Subscribe event :

Download file:


Write content to stage as opaque:


Featured Post

OIC - how can I use XSLT functions to remove leading zeros from numeric and alphanumeric fields?

To remove leading zeros from an numeric field in Oracle Integration Cloud (OIC) using XSLT, you can Use number() Function The number() funct...