Wednesday, November 6, 2024

OIC gen3 - using the OCI Object Storage Action | Create bucket | Upload an object to the bucket

Usecase: 

Here, we will create a bucket and upload an object to OS bucket.

In Oracle Integration Cloud (OIC), we can use the OCI Object Storage action to interact with Oracle Cloud Infrastructure (OCI) Object Storage, allowing integration workflows to upload, download, and manage files stored in OCI.

Supported Operations

Under Manage objects:

  • Upload Object: Store files in a specified bucket, enabling integration processes to archive data or manage backups.
  • Download Object: Retrieve files from a bucket, useful for processing files stored in Object Storage as part of workflows.
  • List Objects: Get details on files within a bucket, useful for fetching metadata or initiating further actions based on file availability.
  • Delete Object: Remove files from a bucket, which is helpful for cleaning up temporary data or managing lifecycle policies
Under manage buckets:
  • Create bucket
  • List buckets
  • Delete buckets

Bucket creation:

Steps to follow:

  1. Create an Application and configure rest trigger to pass the Bucket name as query param or template or body.
  2. Drag and drop the OCI object storage and configure
    1. Choose manage buckets
    2. Choose create.bucket
    3. Choose the compartment
  3. Map the bucket name to be created.
Screenshots:


Upload an object to the Bucket:

Steps to follow:

  1. Create an Application and configure rest trigger to pass the following 
    1. the Bucket name and object name as query param
    2.  Binary object as request body
  2. Drag and drop the OCI object storage and configure
    1. Choose manage objects
    2. Choose upload objects
  3. Map the bucket name, object name and stream reference of the object.
Screenshots:


CCS - About Oracle Utilities Customer Cloud Service

Oracle Utilities Customer Cloud Service is a comprehensive SaaS solution designed to support utilities of all sizes with customer care, service orders, metering, and billing. 

It provides the following features:

  • Customer Information and Lifecycle Management: 
    • Covers sales and marketing, customer data management,
    • service starts and stops, and both inbound and outbound customer interactions.
  • Financial Management: Manages rating, billing, payments, and collections.
  • Meter Data Management: Includes device and measurement management, data validation and estimation, and usage calculations.
  • Service Order Management: Coordinates service order tasks.
  • Operational Device Management: Manages assets, including device tracking, configurations, and settings.
  • Oracle Utilities Cloud Service Foundation: Supports infrastructure processes, data migration, and batch scheduling.
  • Oracle Utilities Analytics Visualization: Offers analytics tools with pre-built models, KPIs, and metrics for data analysis and visualization.

This cloud solution streamlines complex utility processes, enhances customer service, and provides insights for strategic decision-making.

In our project, we will cover the following:

  1. Metering
  2. Payment and collection
  3. Billing
  4. Customer interaction


Reference:

https://docs.oracle.com/en/industries/energy-water/customer-cloud-service/24b/ccs-overview-guide/index.html#page/CCS_OVERVIEW_24B/OUCCS_Overview_Guide.2.2.html#ww1035848

Prebuild integrations:

https://docs.oracle.com/en/industries/energy-water/cloud-integrations/index.html

Oracle Cloud Marketplace: 

 Import the prebuild oracle integration cloud project based accelerator from oracle cloud marketplace.

https://cloudmarketplace.oracle.com/marketplace/en_US/homePage.jspx

Rest apis:

https://docs.oracle.com/en/industries/energy-water/customer-cloud-service/restapi.html


Wednesday, October 30, 2024

OIC - Use of Fault datatype variable | Define Fault Aggregation in Parallel Processing Scenarios

Define Fault Aggregation in Parallel Processing Scenarios
Oracle Integration includes a predefined fault object for fault aggregation. This object enables you to catch and aggregate faults in the context of parallel processing in schedule integrations and to send these faults to an external service to define more granular error handling. To define a fault object and aggregate the faults, you must use actions that support looping (for example, for-each loops, while loops, and so on).
  • append: Adds a new fault to the end of a fault list.
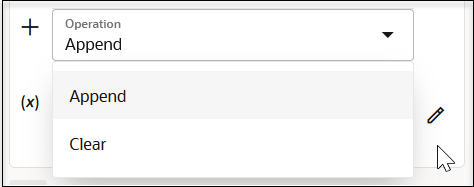
  • clear: Removes all entries in a fault list.
Two fault aggregation operations are available for selection in schedule integrations:
These options are available for selection under the following scenarios:
LocationAppend Option Allowed?Clear Option Allowed?
Top level (that is, outside of any looping actions)YesYes
Inside a for-each action with the Process items in parallel option selectedYesNo
Inside a for-each action loop and a while action loopYesYes
Inside a stage file action configured with the Read File in Segments operationYesNo
Inside a scope actionYesYes
Inside a global fault or a named fault (that is, inside a scope fault handler)YesYes
  1. Create a schedule integration.

    Note:

    The fault object is only supported with schedule integrations.
  2. Create an aggregated fault per the scenarios supported in the above table. For example, create a for-each action, then drag an assign action within the loop.
  3. Create an assignment and select faults from the Datatypes list.
    The page is refreshed to display the Operations list with two options.
  4. The Operation drop-down list is shown with options for Append and Clear.

  5. Build the fault object mapping.

  6. Complete your mapping.

  7. Define an invoke connection to send the aggregated faults to an external service.

    Note:

    Changing the name, data type, or both is only allowed during initial creation of the variable while not yet assigned a value.

Reference:

Sunday, October 27, 2024

OIC - "How to Modify an OIC .iar File from the Backend"

Usecase:

In many projects, we often face last-minute requirements to rename database assets or variables to comply with specific customer naming standards. Renaming everything through the front end can be challenging, especially when it results in invalid mappings that require a complete rebuild from scratch. Recently, we encountered similar situations where we needed to adjust several variable names and update the database schema name to meet customer standards.

To address this, we decided to create a script using Groovy (though this could be done in any language) to review each file in the .iar and apply the necessary changes. Before beginning this bulk update, please ensure you have backed up the current code, as there is a risk of the .iar file becoming corrupted during the process.


Solution steps:

Step1: You must first export the iar file from your OIC instance in order to start the procedure. Then rename the extension from iar to zip. Now you should open the zip file using 7zip.

Step2:

I wrote a simple Groovy script that searches for a specified string across the entire icspackage folder and replaces it with a new string. The script goes through each file, finds the target string, and replaces it. For example, I searched for the variable name localVar_before_demo, which appeared in four files (logged for reference), and replaced it with localVar_after_demo. To use this for other variables or package names, simply update the script and run it.

Groovry script used:

def dir = new File("C:/Users/Work/Software/DEMO/icspackage")


println "=============================START================================"


dir.eachFileRecurse (groovy.io.FileType.FILES) { file ->

    def fileText = file.text

    def first = fileText.indexOf("localVar_before_demo")

    if (first != -1) {

        def searchString = "localVar_before_demo"

        def replaceString = "localVar_after_demo"


        fileText = fileText.replace(searchString, replaceString)

        file.write(fileText)

        println "Change File ==> " + file.path

    }

}


println "=============================END=================================="


Friday, October 25, 2024

OIC XSLT - How to use loop inside loop in transformation |"Dynamic XML Data Transformation with XSLT: A Case Study on Person and Skill Records"

Usecase: Here, we will demonstrate how we can use multiple nested loops one level to fetch skill id based on qualification code for each HCM person.

Bascially person data has qualication codes and we have skill ids, qualifications codes in skill data, and we need to populate a target payload incorporating person details plus skill id based on person qualification code. Thats why need two loops - one outer represents person and one inner represents skill and for each person , we are matching qualification codes for both and fetching skill id and more over, each person can have multiple skills for a qualification codes.


Xslt code used:

<xsl:template match="/" xmlns:id="id_11">

  <nstrgmpr:Write xmlns:id="id_12">

    <ns36:Recordset xmlns:id="id_54">

      <xsl:for-each select="$Stage_ReadPersonRecords/nsmpr9:ReadResponse/nsmpr9:PersonRecord">

        <xsl:variable name="QualificationCode" select="nsmpr9:QUALIFICATION_CODE"/>

        <xsl:variable name="PersonNumber" select="nsmpr9:PERSON_NUMBER"/>

        <xsl:variable name="ValidTo" select="nsmpr9:VALID_TO"/>

        <xsl:variable name="TrainingCompletionDate" select="nsmpr9:TRAINING_COMPLETION_DATE"/>

        <xsl:for-each select="$Stage_ReadSkillIdData/nsmpr4:ReadResponse/ns29:Record[ns29:Code=$QualificationCode]">

          <ns36:Record xmlns:id="id_55">

            <ns36:Responsible xmlns:id="id_58">

              <xsl:value-of xmlns:id="id_59" select="$PersonNumber"/>

            </ns36:Responsible>

            <ns36:Skill xmlns:id="id_56">

              <xsl:value-of xmlns:id="id_254" select="ns29:Id"/>

            </ns36:Skill>

            <ns36:Valid until xmlns:id="id_60">

              <xsl:value-of xmlns:id="id_61" select="$ValidTo"/>

            </ns36:Valid until>

            <ns36:Validity_period xmlns:id="id_62">

              <xsl:choose>

                <xsl:when test="$ValidTo != &quot;&quot;">

                  <xsl:value-of xmlns:id="id_63" select="&quot;Yes&quot;"/>

                </xsl:when>

                <xsl:otherwise>

                  <xsl:value-of xmlns:id="id_63" select="&quot;No&quot;"/>

                </xsl:otherwise>

              </xsl:choose>

            </ns36:Validity_period>

            <ns36:Achievement_Date xmlns:id="id_64">

              <xsl:value-of xmlns:id="id_65" select="$TrainingCompletionDate"/>

            </ns36:Achievement_Date>

            <ns36:Score xmlns:id="id_66">

              <xsl:value-of xmlns:id="id_67" select="&quot;Pass&quot;"/>

            </ns36:Score>

          </ns36:Record>

        </xsl:for-each>

      </xsl:for-each>

    </ns36:Recordset>

  </nstrgmpr:Write>

</xsl:template>


Wednesday, October 23, 2024

OIC - ERP - Manual File Import to UCM from Fusion console for OIC Development in the Absence of HCM Extract Configuration

Use Case: Manual File Import to UCM for OIC Development in the Absence of HCM Extract Configuration

We were tasked with developing an HCM extract to generate a file for downstream processing. The requirement was to extract the file to Oracle UCM, download it, transform it, and then process it for downstream applications. However, the configuration for the HCM extract was not ready at the time, which could have delayed the integration work.

To continue with the Oracle Integration Cloud (OIC) development without waiting for the HCM extract setup, we manually imported the required file into the HCM UCM repository. This allowed us to proceed with testing and development of the OIC process, including file transformation and downstream processing.

This manual approach ensured that the integration work could continue in parallel with the configuration of the HCM extract, thus preventing delays in project timelines.

Comprehensive walkthrough with images:

Login to ERP/HCM console >> home navigation >> tools >> file import and export.


Click (+) button >> choose file >> choose account as hcm/dataloader/import. >> save


Login to Content server >> search default >> there we see the file uploaded successfully which we can download from OIC integration and bulid codes and test.


Tuesday, October 22, 2024

OIC - Converting one XML Field Values to distinct Comma-Separated Entries" | How do I generate a comma-separated list with XSLT/XPath?

Usecase:

Here, we will demonstrate how we can fetch unique comma separeated values for a xml field values.

For instance , here

Input file:

<Root>

  <qualification_code>A</qualification_code>

  <qualification_code>B</qualification_code>

  <qualification_code>A</qualification_code>

  <qualification_code>C</qualification_code>

  <qualification_code>B</qualification_code>

</Root>

Expected Output:

  "A", "B", "C"


Solution:

Implementation steps:

  1. Use distinct-values() function to get the distinct node values.
  2. For each record, take the values using select ="."
  3. Using text field to hard codes like  quotes or comma and space
  4. Use position() != last() condition to avoid the last comma.

xslt code:

<xsl:template match="/" xml:id="id_11">

    <nstrgmpr:Write xml:id="id_12">

        <ns22:RecordSet xml:id="id_31">

            <ns22:Record xml:id="id_32">

                <ns22:Test xml:id="id_36">

                    <xsl:for-each xml:id="id_35" select="distinct-values($readFile/nsmpr2:ReadResponse/ns25:RecordSet/ns25:Record/ns25:QUALIFICATION_CODE)">

                        <xsl:text>"</xsl:text>

                        <xsl:value-of xml:id="id_37" select="."/>

                       <xsl:text>"</xsl:text>

                        <xsl:text>,</xsl:text>

                        <xsl:if test="position() != last()">

                            <xsl:text>, </xsl:text>

                        </xsl:if>

                    </xsl:for-each>

                </ns22:Test>

            </ns22:Record>

        </ns22:RecordSet>

    </nstrgmpr:Write>

</xsl:template>

Screenshot:


Featured Post

11g to 12c OSB projects migration points

1. Export 11g OSB code and import in 12c Jdeveloper. Steps to import OSB project in Jdeveloper:   File⇾Import⇾Service Bus Resources⇾ Se...